Showing posts with label AWS Troubleshooting. Show all posts

Thursday, September 3, 2026

AWS CloudFront Access Denied: CreateInvalidation Operation

If you are getting Access Denied when calling the CreateInvalidation operation from AWS CLI, it must be a permission issue for that user.

In this post, I am using the Jenkins pipeline to build and push the artifacts into S3. I am using CloudFront as the Content Delivery Network (CDN) and hosting my website in Route 53.

When I am trying to invalidate the CloudFront Distribution cache from the CLI, I am getting the error below. I thought adding a screenshot would provide more visibility, so I have added it below.

Error Log:

A client error (AccessDenied) occurred when calling the CreateInvalidation operation: User: arn:aws:iam::xxxxxxxxxxx:user/yyyy is not authorized to perform: cloudfront:

The AWS CLI commands I am using are:

aws configure set preview.cloudfront true

aws cloudfront create-invalidation --distribution-id UJH89JKKMOVY340 --paths "/*"


Resolution:

Add the CreateInvalidation permission to that user. Below are the steps to add the permission.

  • Go to Identity and Access Management (IAM).

  • Go to Users and find your username. In my case, it is Jenkins.

  • Then add a new Inline policy, as shown in the screenshot below.
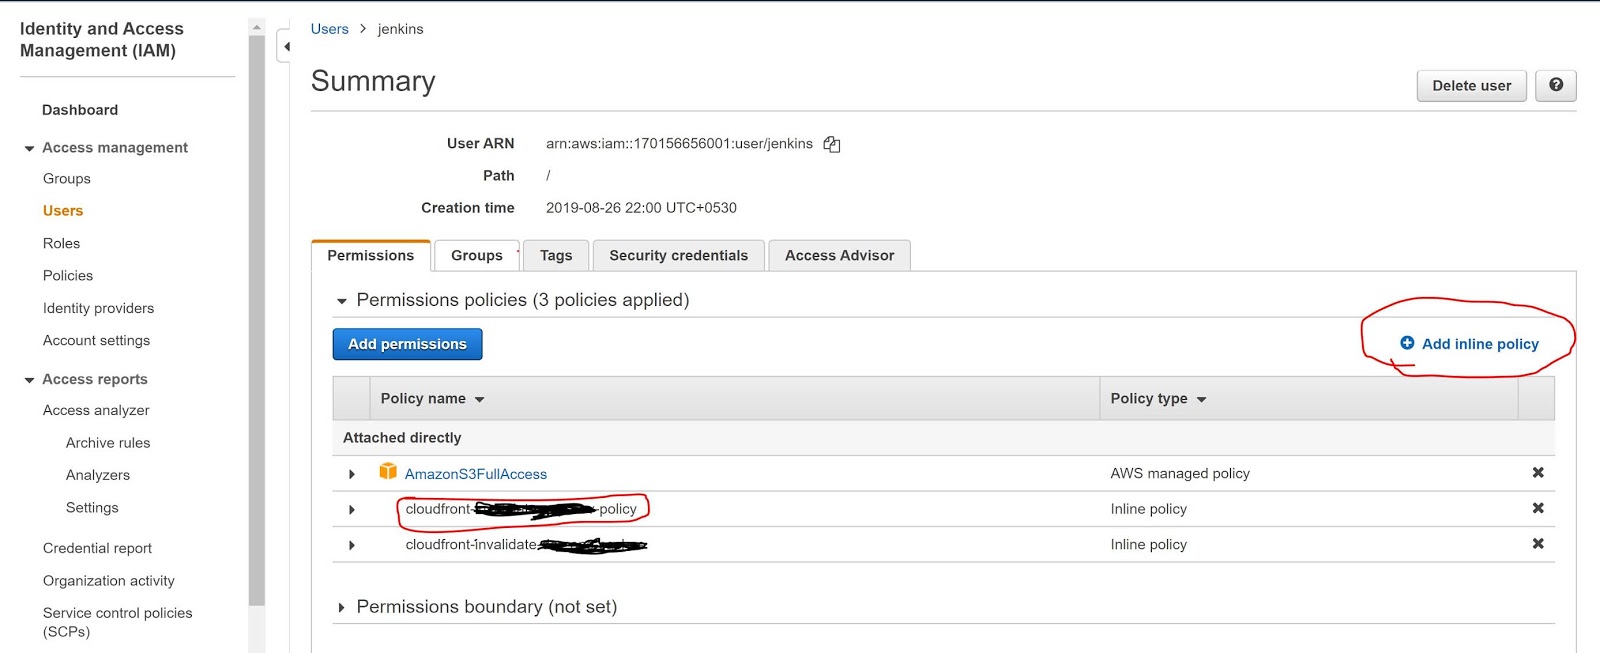


  • Now add the below policy into the JSON policy editor. Below the screenshot.

Policy JSON:-


{
    "Version": "2012-10-17",
    "Statement": [
        {
            "Sid": "VisualEditoro",
            "Effect": "Allow",
            "Action": "cloudfront:CreateInvalidation",
            "Resource": "arn:aws:cloudfront::17088938460999:distribution/UJH89JKKMOVY340"
        }
    ]
}


Sample Screenshot:-


Now, it's working fine. I can see the Jenkins logs below.

Jenkins Success Log:-

; perhaps you meant to use ‘PATH+EXTRA=/something/bin’?
+ aws configure set preview.cloudfront true
[Pipeline] sh
Warning: JENKINS-41339 probably bogus PATH=/var/lib/jenkins/tools/jenkins.plugins.nodejs.tools.NodeJSInstallation/node-v10.16.3-linux-x64/bin:/var/lib/jenkins/tools/hudson.model.JDK/JDK8-152/bin:$PATH:/usr/local/bin:$MAVEN_HOME/bin:/usr/local/bin:/var/lib/jenkins/tools/hudson.tasks.Maven_MavenInstallation/mvn/bin:/usr/sbin:/usr/bin:/sbin:/bin; perhaps you meant to use ‘PATH+EXTRA=/something/bin’?
+ aws cloudfront create-invalidation --distribution-id UJH89JKKMOVY340 --paths '/*'
{
    "Invalidation": {
        "Status": "InProgress", 
        "InvalidationBatch": {
            "Paths": {
                "Items": [
                    "/*"
                ], 
                "Quantity": 1
            }, 
            "CallerReference": "cli-1588239578-85708"
        }, 
        "Id": "I3HILN71CKWOV4", 
        "CreateTime": "2020-04-30T09:39:38.919Z"
    }, 
    "Location": "https://cloudfront.amazonaws.com/2019-03-26/distribution/UJH89JKKMOVY340/invalidation/I3HILN71CKWOV4"
}


Hope this will help you. 

Thursday, June 13, 2019

AWS Lambda AccessDeniedException While Calling getIntents

I am getting the below issue (AccessDeniedException ) while calling getIntents in lambda function with NodeJs. Below screenshot shows my lambda function call.


AccessDeniedException Logs 


2019-06-13T05:11:41.415Z 2b50a8fb-81bc-4f35-b024-d8c4a7864c74 INFO { AccessDeniedException: User: arn:aws:sts::156576774796:assumed-role/fulfilClaimProcessRole/fulfilClaimProcess is not authorized to perform: lex:GetIntents on resource: arn:aws:lex:us-east-1:156576774796:intent:*at Object.extractError (/var/runtime/node_modules/aws-sdk/lib/protocol/json.js:51:27)at Request.extractError (/var/runtime/node_modules/aws-sdk/lib/protocol/rest_json.js:55:8)at Request.callListeners (/var/runtime/node_modules/aws-sdk/lib/sequential_executor.js:106:20)at Request.emit (/var/runtime/node_modules/aws-sdk/lib/sequential_executor.js:78:10)at Request.emit (/var/runtime/node_modules/aws-sdk/lib/request.js:683:14)at Request.transition (/var/runtime/node_modules/aws-sdk/lib/request.js:22:10)at AcceptorStateMachine.runTo (/var/runtime/node_modules/aws-sdk/lib/state_machine.js:14:12)at /var/runtime/node_modules/aws-sdk/lib/state_machine.js:26:10at Request.<anonymous> (/var/runtime/node_modules/aws-sdk/lib/request.js:38:9)at Request.<anonymous> (/var/runtime/node_modules/aws-sdk/lib/request.js:685:12)message:'User: arn:aws:sts::156576774796:assumed-role/fulfilClaimProcessRole/fulfilClaimProcess is not authorized to perform: lex:GetIntents on resource: arn:aws:lex:us-east-1:156576774796:intent:*',code: 'AccessDeniedException',time: 2019-06-13T05:11:41.355Z,requestId: 'baaca585-8d99-11e9-a134-070d28c2c0ab',statusCode: 403,retryable: false,retryDelay: 64.04832064780818 } 'AccessDeniedException: User: arn:aws:sts::156576774796:assumed-role/fulfilClaimProcessRole/fulfilClaimProcess is not authorized to perform: lex:GetIntents on resource: arn:aws:lex:us-east-1:156576774796:intent:*\n at Object.extractError (/var/runtime/node_modules/aws-sdk/lib/protocol/json.js:51:27)\n at Request.extractError (/var/runtime/node_modules/aws-sdk/lib/protocol/rest_json.js:55:8)\n at Request.callListeners (/var/runtime/node_modules/aws-sdk/lib/sequential_executor.js:106:20)\n at Request.emit (/var/runtime/node_modules/aws-sdk/lib/sequential_executor.js:78:10)\n at Request.emit (/var/runtime/node_modules/aws-sdk/lib/request.js:683:14)\n at Request.transition (/var/runtime/node_modules/aws-sdk/lib/request.js:22:10)\n at AcceptorStateMachine.runTo (/var/runtime/node_modules/aws-sdk/lib/state_machine.js:14:12)\n at /var/runtime/node_modules/aws-sdk/lib/state_machine.js:26:10\n at Request.<anonymous> (/var/runtime/node_modules/aws-sdk/lib/request.js:38:9)\n at Request.<anonymous> (/var/runtime/node_modules/aws-sdk/lib/request.js:685:12)'

Solutions :- It seems there is no access/privileges to access that resource. Now , I am going to give "AmazonLexFullAccess" to my lambda function. You need to attach the policy to your lambda function. Follow the below steps to attach the new permission.

  • Goto ->  Security, Identity, & Compliance => IAM (Identity and Access Management) 
  • Select Roles => Select your Lambda function role(Which is you would have created during function creation?) 
  • Now click on Attach policy 
  • Find AmazonLexFullAccess and click on attach.

Once you provide the AmazonLexFullAccess to your lambda function role , you will be able to call your lex:intents call. Its working for me. See the below response I got from the lex:intents call. I got my all intents I have created.


{
    "intents": [
        {
            "name": "AutoLoanDepartment",
            "description": null,
            "lastUpdatedDate": "2019-06-04T10:03:16.995Z",
            "createdDate": "2019-06-04T05:16:50.430Z",
            "version": "$LATEST"
        },
        {
            "name": "BookCar",
            "description": "Intent to book a car on StayBooker",
            "lastUpdatedDate": "2019-06-04T03:23:05.817Z",
            "createdDate": "2019-06-04T03:19:44.041Z",
            "version": "$LATEST"
        },
        {
            "name": "BookHotel",
            "description": "Intent to book a hotel on StayBooker",
            "lastUpdatedDate": "2019-06-04T03:19:43.241Z",
            "createdDate": "2019-06-04T03:19:43.241Z",
            "version": "$LATEST"
        },
        {
            "name": "ClaimDepartment",
            "description": null,
            "lastUpdatedDate": "2019-06-05T10:19:51.705Z",
            "createdDate": "2019-06-05T10:19:51.705Z",
            "version": "$LATEST"
        },
        {
            "name": "ClaimProcess",
            "description": null,
            "lastUpdatedDate": "2019-06-13T04:43:06.699Z",
            "createdDate": "2019-06-06T03:35:33.460Z",
            "version": "$LATEST"
        },
        {
            "name": "GreetingMSG",
            "description": null,
            "lastUpdatedDate": "2019-06-11T08:02:33.055Z",
            "createdDate": "2019-06-06T03:35:06.013Z",
            "version": "$LATEST"
        },
        {
            "name": "LoanDepartment",
            "description": null,
            "lastUpdatedDate": "2019-06-04T05:14:16.304Z",
            "createdDate": "2019-06-04T03:36:52.751Z",
            "version": "$LATEST"
        },
        {
            "name": "PersonalLoanDept",
            "description": null,
            "lastUpdatedDate": "2019-06-04T03:32:46.542Z",
            "createdDate": "2019-06-04T03:32:46.542Z",
            "version": "$LATEST"
        },
        {
            "name": "PolicyProcess",
            "description": null,
            "lastUpdatedDate": "2019-06-06T06:01:46.064Z",
            "createdDate": "2019-06-06T06:01:46.064Z",
            "version": "$LATEST"
        },
        {
            "name": "RenewPolicy",
            "description": null,
            "lastUpdatedDate": "2019-06-07T07:05:13.123Z",
            "createdDate": "2019-06-06T10:29:21.371Z",
            "version": "$LATEST"
        }
    ],
    "nextToken": null
}


Hope this will help you. 

AWS Lex: Version Mismatch Issue and Simple Fix

This is very common problem with Lex when you are working with a version which is not matching with the published one. I have fixed this with a simple refresh the page. Either, you can reload your bot again. I will keep posting more on AWS Lex, lambda, cognito, ec2,etc in my upcoming posts, so stay tune here  :)

Saturday, February 18, 2017

Recover Missing or Unallocated Space on a USB Drive Using DiskPart

Recover Missing Or Un-allocated Space On A USB Drive - using disk-part


Are you worried about your USB Drive? You are thinking you have lost your USB. But, this is quite obvious when you have done something with your USB drive. What happened to your USB Drive ?

Normally when you are playing with file systems , you should bit aware about the pros and cons. However, you no need to worry . You can recover your USB Drive memory space once again.

Every Operating System(OS) has different file systems. When you use your USB Drive cross platform purpose, It mean you are playing with different file systems. What happened to your USB Drive ? Why its not allowing/showing you to the original space/capacity ? 


Let's Assume..... with few below points.

1. May be you have deleted the partition. It means Un-allocated space.
2. May be you have burned your space with some different file system , which is not supported by your current OS file system.
3. May be some other reason.


Here, In this post I have lost my memory space . I have burned my USB Drive space, because I was creating bootable Linux Installation drive.I will post in my next article
how to create a bootable USB drive. I have used the below USB Drive for this Post.

USB Drive Details:-

San Disk , 16 GB Capacity

You need to just check with Windows Disk Management. You will find all information about your computer/desktop drive. Below disk management image shows the disk status.
This will show you the disk allocation , disk space usage, and some other helpful information.
 
java developers guide - disk managment tool
Disk Management - Windows


As I mentioned above, I have lost my pendrive. Its not useful for me until I recover the memory. I am using here Windows 10 OS to recover my lost space.

Windows OS is providing feature to manage your disk partitions using diskpart command.

Open command line or run command and type diskpart.

java developers guide- diskpart
diskpart - open by run command


Now, just simply follow the below commands one-by-one.

1. Check the list of disks in your computer.

          list disk

2. Select your disk that you want to recover. You need to be very careful here , because if you choose the wrong disk you might loose some other data. So, here I am choosing disk 1. Because, its a common sense  my USB Drive capacity is 16 GB.

       select disk 1

3. Now , do clean for your chosen disk.

       clean

4. Now, you have already got successfully cleaning the disk message. Now you need to create a partition for your disk . This is the primary partition, though you are creating only one drive.

     create partition primary

5. If you got succeeded, then you are done. Just exit.

    exit


Below Image will help you to get the commands easily. 


java_developers_guide_diskpart console
diskpart console


Your USB Drive is not yet ready to use. You have just recovered your space, but you need to format the USB Drive. Being I am using Windows 10 , I need to format this USB Drive
to Windows compatible. Windows OS compatible file systems are NFTS,FAT/FAT16/FAT32. Below image will show you ....


java developers guide - formatting
Formatting - recovered

Hope you are happy now :) You got your USB Drive back.. and same some Dollars :)

Friday, July 1, 2016

How to Test a Web Service Using cURL from the Command Line

How to test web service using command line curl.


How to test web service using command line curl, is a very often requirement.

This is always very easy to call the web service via a java client,  but sometimes we need to call the service using curl.

One thing you know ? its really very tactical to  call the web service from terminal/command line using curl command.


I have  steps with sample example :-


You need to know the below things before calling the service via curl.

Service Endpoint - The web service endpoint you want to call.

Example - http://myserverip.mycorpnet.com.au:16500/NaaSAutomation/NaaSManageService

Operation Name - The operation name , you want to execute.

Example - readProviderRequest

SoapAction - The soap action defined in WSDL.

Example - SOAPAction:/NaaSAutomation/Resources/WSDLs/ESB/Service/NaaSManageService-service0.serviceagent/NaaSManageServicePortEndpoint0/ManageProviderRead

Create sample valid request xml for sending to the service.

Request.xml
------------------

<soapenv:Envelope xmlns:soapenv="http://schemas.xmlsoap.org/soap/envelope/" xmlns:dto="http://dto.service.myservice.networkservice.test.service.mycorp.com.au/">
   <soapenv:Header/>
   <soapenv:Body>
      <dto:readProviderRequest>
         <callerIdentity>myIdentity</callerIdentity>
         <dto:ProviderName>techbyteslearn</dto:ProviderName>
      </dto:readProviderRequest>
   </soapenv:Body>
</soapenv:Envelope>

Curl Command :-

curl --header "Content-Type: text/xml;charset=UTF-8" --header "SOAPAction:/NaaSAutomation/Resources/WSDLs/ESB/Service/NaaSManageService-service0.serviceagent/NaaSManageServicePortEndpoint0/ManageProviderRead" --data @Request.xml http://myserverip.mycorpnet.com.au:16500/NaaSAutomation/NaaSManageService

Response got from Curl :-

<SOAP-ENV:Envelope xmlns:SOAP-ENV="http://schemas.xmlsoap.org/soap/envelope/">
   <SOAP-ENV:Body>
      <ns0:ManageProviderCreateRes xmlns:ns0="http://www.mycorpnet.com.au/NaaSAutomation/Resources/Schemas/CreateRequest.xsd">
         <ns0:response>
            <ns0:providerName>techbyteslearn</ns0:providerName>
            <ns0:createStatus>SUCCESS</ns0:createStatus>
            <ns0:rollbackInitiated>TRUE</ns0:rollbackInitiated>
         </ns0:response>
      </ns0:ManageProviderCreateRes>
   </SOAP-ENV:Body>
</SOAP-ENV:Envelope>