Showing posts with label Java 8. Show all posts

Monday, September 7, 2026

Find Number of Days Between Two Dates in Java

Find Number of Days Between Two Given Dates in Java

Sometimes we need to find the number of days between two given dates. Earlier, I used Calendar and manually calculated the difference between the dates.

With Java 8 and later, this can be done much more easily using the java.time package.

import java.time.LocalDate;
import java.time.format.DateTimeFormatter;
import java.time.temporal.ChronoUnit;

public class FindDays {

    public static void main(String[] args) {

        String str1 = "20/01/2013";
        String str2 = "28/03/2013";

        DateTimeFormatter formatter =
                DateTimeFormatter.ofPattern("dd/MM/yyyy");

        LocalDate date1 = LocalDate.parse(str1, formatter);
        LocalDate date2 = LocalDate.parse(str2, formatter);

        long days = ChronoUnit.DAYS.between(date1, date2);

        System.out.println("Final Days.... " + days);
    }
}

Output:

Final Days.... 67

How it works

DateTimeFormatter is used to tell Java the format of the input dates.

LocalDate represents a date without a time or timezone.

ChronoUnit.DAYS.between() calculates the number of days between the two dates.

For example:

20/01/2013 → 28/03/2013 = 67 days

The older Calendar approach can still be found in existing Java applications, but for new development, the java.time API is generally the better choice.


Wednesday, July 10, 2019

Find a Missing Number from a List Using Java 8 Streams

In this article, we will find the missing number from a list of numbers using java 8.  This is one of important questions asked in interview. This program is to find the only one missing number. Check how to find all missing numbers from a list. In this program we will use only java 8 stream to find the missing number. Earlier post we had seen how to use stream to sort the employee. Check more how find one missing number using traditional core java style


FindMissingNumber.java

package com.techbyteslearn.lab.basic;
import java.util.ArrayList;
import java.util.Arrays;
import java.util.Comparator;
import java.util.stream.IntStream;

public class FindMissingNumber {
public static void main(String[] args) {
ArrayList<Integer> numberList = new ArrayList<Integer>(Arrays.asList(1, 3, 2, 4, 5, 6, 7, 9, 10));
// Get the Max value from the List.
int maxValue = numberList.stream().max(Comparator.naturalOrder()).get().intValue();
// Get sum of all natural numbers - upto the above maxvalue
int sumOfAllNumber = IntStream.range(1, maxValue + 1).sum();
// Get the sum of all number inside List.
int sumofList = numberList.stream().mapToInt(Integer::intValue).sum();
// Now print the missing number.
System.out.println("The Missing Number is:: " + (sumOfAllNumber - sumofList));
}
}

Output - 

The Missing Number is:: 8

Tuesday, July 9, 2019

Sort Employees by Name and Age Using Java 8

This program for writing a program to sort the employee by name and age using JDK 8. Java 8 introduced many out of box features for developers. The comparator in java 8 is marked as @FunctionalInterface, and it provide a cleaner way to develop your code. We had already discussed how the Comparator<T> interface works before java 8. In this post, we will use the stream API with comparator. 


Employee.java


package com.techbyteslearn.lab.basic;

public class Employee {
private String name;
private int age;
private String department;
public Employee(String name, int age, String department) {
super();
this.name = name;
this.age = age;
this.department = department;
}
@Override
public String toString() {
return "\n Employee [name=" + name + ", age=" + age + ", department=" + department + "]";
}
public String getName() {
return name;
}
public void setName(String name) {
this.name = name;
}
public int getAge() {
return age;
}
public void setAge(int age) {
this.age = age;
}
public String getDepartment() {
return department;
}
public void setDepartment(String department) {
this.department = department;
}
}


Now we will create an action or main method to use the above POJO class for sorting.

SortEmployeeWithStream.java

package com.techbyteslearn.lab.basic;
import java.util.ArrayList;
import java.util.Comparator;
import java.util.stream.Collectors;
public class SortEmployeeWithStream {
public static void main(String[] args) {
Employee1 e1 = new Employee1("Ander Koli", 32, "Sales");
Employee1 e2 = new Employee1("Andrew Smith", 23, "Sales");
Employee1 e3 = new Employee1("David Jone", 52, "Sales");
Employee1 e4 = new Employee1("Cuba Station", 23, "Marketing");
Employee1 e5 = new Employee1("Bradley Head", 23, "Marketing");
Employee1 e6 = new Employee1("Peter Parker", 34, "Sales");
// Create an arraylist and add all the employee object into that list.
ArrayList<Employee1> employeeList = new ArrayList<Employee1>();
employeeList.add(e1);
employeeList.add(e2);
employeeList.add(e3);
employeeList.add(e4);
employeeList.add(e5);
employeeList.add(e6);
System.out.println("Employee list before sorting -\n" + employeeList);
ArrayList<Employee1> sortedList = (ArrayList) employeeList.stream()
.sorted(Comparator.comparing(Employee1::getName).thenComparing(Employee1::getAge))
.collect(Collectors.toList());
System.out.println("Employee list after sorting -\n" + sortedList);
}
}


Output-

Employee list before sorting -
[
 Employee1 [name=Ander Koli, age=32, department=Sales],
 Employee1 [name=Andrew Smith, age=23, department=Sales],
 Employee1 [name=David Jone, age=52, department=Sales],
 Employee1 [name=Cuba Station, age=23, department=Marketing],
 Employee1 [name=Bradley Head, age=23, department=Marketing],
 Employee1 [name=Peter Parker, age=34, department=Sales]]
Employee list after sorting -
[
 Employee1 [name=Ander Koli, age=32, department=Sales],
 Employee1 [name=Andrew Smith, age=23, department=Sales],
 Employee1 [name=Bradley Head, age=23, department=Marketing],
 Employee1 [name=Cuba Station, age=23, department=Marketing],
 Employee1 [name=David Jone, age=52, department=Sales],
 Employee1 [name=Peter Parker, age=34, department=Sales]]

The Comparator.comparing  and thenComparing  two static methods inside Comparator. As we know Comparator is a Functional interface which provides default and static methods along with implementation.  These functional interfaces are giving out of box functionality. See how before java 8 with Comparator interface examples.

Also we can achieve the above sorting by creating multiple different comparators , which we can use when we need. 

We have created two comparator as compareByAge, CompareByDept . Now we can use those comparators at any place we need along with stream. Below sample code snippet shows the usages. Read these reference documents for more about  stream, comparator, functions, jdk 8 features.


Comparator<Employee1> compareByAge = Comparator.comparing(Employee1::getAge);
Comparator<Employee1> compareByDept = Comparator.comparing(Employee1::getDepartment);
ArrayList<Employee1> sortedList = (ArrayList) employeeList.stream()
.sorted(compareByAge.thenComparing(compareByDept)).collect(Collectors.toList());


Comparable vs Comparator in Java: Understanding the Comparable Interface


In this article we will see what is Comparable<T> interface ? How to use this interface with some sample examples ?

The Comparator interface is present inside java.util package. Its comparison function, which imposes a total ordering on some collection of objects. Its mostly used while sorting a collection of objects.  Means, it compares its two arguments for order.  Returns a negative integer,zero, or a positive integer as the first argument is less than, equal to, or greater than the second one.

The Comparators can be passed to a sort method (i.e. Collections.sort or Arrays.sort) to allow precise control over the sorting order. Comparators can also be used to control the order of certain data structures (such as sorted sets or sorted maps), or to provide an ordering for collections of objects that don't have a natural ordering.

This interface has one important method (Before JDK 8)  -

int compare(T o1, T o2);


The below Employee class is our POJO , we will use this class to sort the employee list by age and department.

Employee.java

package com.techbyteslearn.lab.basic;

public class Employee {
private String name;
private int age;
private String department;
public Employee(String name, int age, String department) {
super();
this.name = name;
this.age = age;
this.department = department;
}
@Override
public String toString() {
return "\n Employee [name=" + name + ", age=" + age + ", department=" + department + "]";
}
public String getName() {
return name;
}
public void setName(String name) {
this.name = name;
}
public int getAge() {
return age;
}
public void setAge(int age) {
this.age = age;
}
public String getDepartment() {
return department;
}
public void setDepartment(String department) {
this.department = department;
}
}

Now, we need to create a comparator to compare two same objects. We can create as many comparators by implementing each field/attributes of the pojo. Its purely business requirement, how you need your sorting functionality. Here we need the sorting based on the employee  age and employee department.

EmployeeAgeComparator.java

package com.techbyteslearn.lab.basic;
import java.util.Comparator;

public class EmployeeAgeComparator implements Comparator<Employee> {
@Override
public int compare(Employee emp1, Employee emp2) {
return emp1.getAge() - emp2.getAge();
}
}


EmployeeDeptComparator.java

package com.techbyteslearn.lab.basic;
import java.util.Comparator;

public class EmployeeDeptComparator implements Comparator<Employee> {
@Override
public int compare(Employee emp1, Employee emp2) {
// Internally for comparing String we need to use compareTo()
return emp1.getDepartment().compareTo(emp2.getDepartment());
}
}

In the above we created two comparator for age and department. Now, we need to action on our comparators. We will call our newly created comparator from main() and see the result. Below EmployeeComparatorExample class show the comparator in action.


EmployeeComparatorExample.java

package com.techbyteslearn.lab.basic;
import java.util.ArrayList;
import java.util.Collections;

public class EmployeeComparatorExample {
public static void main(String[] args) {
Employee e1 = new Employee("Matt Kuban", 32, "IT");
Employee e2 = new Employee("Andrew Smith", 42, "HR");
Employee e3 = new Employee("Butler Jason", 52, "HR");
Employee e4 = new Employee("Miss Linda", 35, "HR");
Employee e5 = new Employee("Bradley Head", 23, "IT");
Employee e6 = new Employee("Peter Parker", 34, "ADMIN");
// Create an arraylist and add all the employee object into that list.
ArrayList<Employee> employeeList = new ArrayList<Employee>();
employeeList.add(e1);
employeeList.add(e2);
employeeList.add(e3);
employeeList.add(e4);
employeeList.add(e5);
employeeList.add(e6);
System.out.println("Employee Before Sort ::" + employeeList);
// Using EmployeeAgeComparator - to sort the employee by Age
EmployeeAgeComparator ageComparator = new EmployeeAgeComparator();
Collections.sort(employeeList, ageComparator);
// Using EmployeeDeptComparator - to sort the employee by Department
EmployeeDeptComparator deptComparator = new EmployeeDeptComparator();
Collections.sort(employeeList, deptComparator);
System.out.println("Employee After Sort ::" + employeeList);
}
}

Output :- 

Employee Before Sort ::[
 Employee [name=Matt Kuban, age=32, department=IT],
 Employee [name=Andrew Smith, age=42, department=HR],
 Employee [name=Butler Jason, age=52, department=HR],
 Employee [name=Miss Linda, age=35, department=HR],
 Employee [name=Bradley Head, age=23, department=IT],
 Employee [name=Peter Parker, age=34, department=ADMIN]]

Employee After Sort ::[
 Employee [name=Peter Parker, age=34, department=ADMIN],
 Employee [name=Miss Linda, age=35, department=HR],
 Employee [name=Andrew Smith, age=42, department=HR],
 Employee [name=Butler Jason, age=52, department=HR],
 Employee [name=Bradley Head, age=23, department=IT],
 Employee [name=Matt Kuban, age=32, department=IT]]


JAVA 8 

In JDK 8,  Comparator<T> is functional Interface. Its annotated with @FunctionalInterface and this comparator interface has added few more default & static methods. As its a functional interface therefore its will be used as the assignment target for a lambda expression or method reference.

Below are few examples :-

default Comparator<T> reversed()
default Comparator<T> thenComparing(Comparator<? super T> other)
default <U> Comparator<T> thenComparing(
            Function<? super T, ? extends U> keyExtractor,
            Comparator<? super U> keyComparator)
default <U extends Comparable<? super U>> Comparator<T> thenComparing(
            Function<? super T, ? extends U> keyExtractor)
default Comparator<T> thenComparingInt(ToIntFunction<? super T> keyExtractor)


Here is the full list of methods added into Comparator<T> . We can use stream api of java 8 with lambda expression to implements comparator interface. We will see in the next subsequent posts on lambda expression and stream api.


Happy Learning.

Saturday, October 27, 2018

Filter Strings Using Stream API in Java


In this article we will learn how to use Java 8 Stream Filter with Example,  I have used String list to filter the names. Stream, A sequence of elements supporting sequential and parallel aggregate operations. Below example will show you how to filter the list with predicate.

StringFilterUsingStream.java

package com.techbyteslearn.tutorial;

import java.util.ArrayList;
import java.util.List;
import java.util.stream.Collectors;

public class StringFilterUsingStream {

    public static void main(String[] str) {

        List<String> nameList = new ArrayList<String>();

        nameList.add("Roshna");
        nameList.add("Amit Kumar");
        nameList.add("Manoj");
        nameList.add("Neha");
        nameList.add("Rina");
        nameList.add("Ashna");
        nameList.add("Peter");
        nameList.add("Deb Kumar");

        System.out.println("All Names ::");
        nameList.stream().forEach(name -> System.out.println(name));

        // Filter all names ending with "Kumar"
        List<String> filteredList = nameList.stream()
                .filter(name -> name.endsWith("Kumar"))
                .collect(Collectors.toList());

        System.out.println("\nFiltered Names ::");
        filteredList.stream().forEach(name -> System.out.println(name));
    }
}

Output:

All Names :: Roshna Amit Kumar Manoj Neha Rina Ashna Peter Deb Kumar Filtered Names :: Amit Kumar Deb Kumar

I changed the comment from “ends with” to “ending with” and formatted the stream expression for readability. The program logic remains the same.


Hope this will help you. Happy Learning.


Sunday, April 22, 2018

Check NullPointerException in JDK 8 – Use Optional


How to handle NullPointerException or null check in JDK8 ? Checking null in JDK8 using Optional<T>.

NullPointerException is most common exception which each developer need to handle. Its very common while you are playing around many object. Before JDK 8 , it was a tedious task and lots of boilerplate code you need to write to handle this NullPointerException. But, after JDK 8 it Make your code more readable and protect it against null pointer exceptions. This API will help to write cleaner and more readable code , with intelligence to handle null check internally.

Below Example has few demonstration , how to use the Optional<T> api to avoid NullPointerException. You can handle Null check for your object.


Employee.java


package com.techbyteslearn.tutorial.jdk8;

public class Employee {
private String empName;
private int age;
private Address empAddress;
public String getEmpName() {
return empName;
}
public void setEmpName(String empName) {
this.empName = empName;
}
public int getAge() {
return age;
}
public void setAge(int age) {
this.age = age;
}
public Address getEmpAddress() {
return empAddress;
}
public void setEmpAddress(Address empAddress) {
this.empAddress = empAddress;
}
}

Address.java
package com.techbyteslearn.tutorial.jdk8;
public class Address {
private String homeUnitNo;
private String streetNo;
private String city;
public String getHomeUnitNo() {
return homeUnitNo;
}
public void setHomeUnitNo(String homeUnitNo) {
this.homeUnitNo = homeUnitNo;
}
public String getStreetNo() {
return streetNo;
}
public void setStreetNo(String streetNo) {
this.streetNo = streetNo;
}
public String getCity() {
return city;
}
public void setCity(String city) {
this.city = city;
}
}

NullPointerCheck.java

package com.techbyteslearn.tutorial.jdk8; import java.util.Optional; public class NullPointerCheck { public static void main(String[] args) { String empName = null; /** * Before JDK 8, this will print "Print null". */ if (null != empName) { System.out.println("Print not null"); } else { System.out.println("Print null"); } /** * Before JDK 8, this throws NullPointerException. */ try { if (empName.equals("SomeThing")) { System.out.println("Print SomeThing"); } } catch (Exception e) { e.printStackTrace(); } /** * JDK 8 provides an easy and clean API, i.e. Optional<T>, * for handling this type of scenario. */ Optional<String> optionalString = Optional.ofNullable(empName); if (optionalString.isPresent()) { System.out.println("Employee Name ::" + empName); } /** * How to work with your own objects. */ Employee employee = new Employee(); employee.setEmpName("Peter"); Optional<Employee> optionalEmployee = Optional.ofNullable(employee); if (optionalEmployee.map(Employee::getEmpAddress).isPresent()) { System.out.println(employee.getEmpName() + "- Address is registered"); } else { System.out.println(employee.getEmpName() + "- Address is null"); } Employee employee1 = new Employee(); employee1.setEmpName("Mark Garret"); Address address = new Address(); address.setCity("Sydney"); employee1.setEmpAddress(address); Optional<Employee> optionalEmployeeWithAddress = Optional.ofNullable(employee1); if (optionalEmployeeWithAddress.map(Employee::getEmpAddress).isPresent()) { System.out.println( employee1.getEmpName() + "- Address is " + address.getCity()); } else { System.out.println(employee1.getEmpName() + "- Address is null"); } /** * Use Optional.empty() to represent an empty value. */ Employee empObject = new Employee(); System.out.println( "Returns Optional empty Value ::" + Optional.empty()); /* * Optional.of() does not handle null values. Be careful when using * this method. Use ofNullable() when the value may be null. */ System.out.println( "Returns Optional empty Value ::" + Optional.of(empObject) .map(Employee::getEmpAddress) .isPresent()); } }

Output:

Print null java.lang.NullPointerException at com.javadevelopersguide.tutorial.jdk8.NullPointerCheck.main(NullPointerCheck.java:48) Peter- Address is null Mark Garret- Address is Sydney Returns Optional empty Value ::Optional.empty Returns Optional empty Value ::false


Small technical note: Optional.of(empObject) itself is safe here because empObject is not null. The map() operation then produces Optional.empty() because getEmpAddress() returns null.

I have used below methods from Optional<T> :-

empty() - Returns an empty Optional instance


of() - Returns an Optional with the specified present non-null value.


isPresent() - If a value is present, invoke the specified consumer with the value, otherwise do nothing.


map() - If a value is present, apply the provided mapping function to it, and if the result is non-null, return an Optional describing the result.


ofNullable() - Returns an Optional describing the specified value, if non-null, otherwise returns an empty Optional.


There are few more methods are there, you can give a try. Below link will give you a complete information. Read more about the Optional<T> by JDK 8.


Hope it will help you.

Thursday, March 15, 2018

How to Create Your First Spring Boot Application

Developing your first Spring Boot application is quite easy. As we know Spring Boot makes it easy to create stand-alone, production-grade Spring based Applications that you can "just run". Its basically to minimize the configuration. 

In this example I have used below frameworks and tools for this example.

1. Maven 3.3.9 
2. JDK 1.8
3. Eclipse IDE
4. spring-boot dependency 


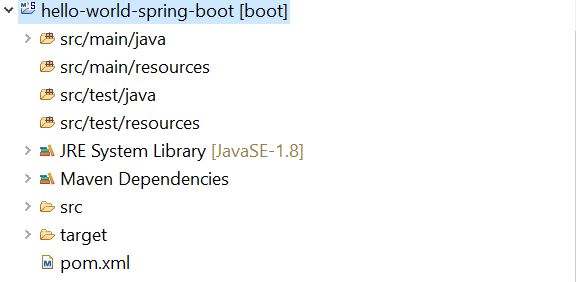
First step - In eclipse create a maven project  "hello-world-spring-boot" as below .


Then add the dependency for spring-boot and plug-in in the pom.xml file.


Pom.xml

<project xmlns="http://maven.apache.org/POM/4.0.0" xmlns:xsi="http://www.w3.org/2001/XMLSchema-instance"
xsi:schemaLocation="http://maven.apache.org/POM/4.0.0 http://maven.apache.org/xsd/maven-4.0.0.xsd">
<modelVersion>4.0.0</modelVersion>
<groupId>com.javadevelopersguide.www</groupId>
<artifactId>hello-world-spring-boot</artifactId>
<version>0.0.1-SNAPSHOT</version>
<description>This is a hello world example with Spring Boot.</description>
<parent>
<groupId>org.springframework.boot</groupId>
<artifactId>spring-boot-starter-parent</artifactId>
<version>1.5.10.RELEASE</version>
</parent>
<dependencies>
<dependency> <groupId>org.springframework.boot</groupId> <artifactId>spring-boot-starter-web</artifactId> </dependency> </dependencies>
<properties>
<java.version>1.8</java.version>
</properties>
<build>
<plugins>
<plugin>
<groupId>org.springframework.boot</groupId>
<artifactId>spring-boot-maven-plugin</artifactId>
</plugin>

</plugins>
</build>
</project>
Then create a controller class "HelloWorldController" with a rest api method sayHello()

HelloWorldController.java
package com.techbyteslearn.springboot.example;
import org.springframework.boot.autoconfigure.EnableAutoConfiguration;
import org.springframework.stereotype.Controller;
import org.springframework.web.bind.annotation.RequestMapping;
import org.springframework.web.bind.annotation.ResponseBody;

@Controller
@EnableAutoConfiguration
public class HelloWorldController {
@RequestMapping("/hello")
@ResponseBody
public String sayHello() {
return "Hello World Developer!!!";
}
}
I have use below annotations in my controller. Here in this example the uri path is /hello

@Controller - This is used to specify the controller , as its spring framework basic.
@EnableAutoConfiguration - This enable auto configuration for Application Context. 
@RequestMapping - This is used to map to spring mvc controller method.
@ResponseBody - Used to bind http response body with a domain object in return type.Its behind the scenes. 

Now , my controller is ready.Just I need a luncher , who can lunch my spring boot application. I have created a "SpringBootApplicationLuncher".

SpringBootApplicationLuncher.java


package com.techbyteslearn.springboot.example;
import org.springframework.boot.SpringApplication;

public class SpringBootApplicationLuncher {
public static void main(String[] args) {
SpringApplication.run(HelloWorldController.class, args);
}
}

Now you can run this launcher to start the spring boot application.Then, you can see the below screenshot showing the tomcat is started. As you know spring-boot is embedded with tomcat feature.


Now , your application is up and running . I have highlighted above that the tomcat is started on default port 8080

Try this tomcat URL, which is running now :- http://localhost:8080/hello


Alternatively , Also you can also start your spring-boot application on command line (Terminal). I have used windows OS.

You can use the below Maven Command  to build and run this spring-boot application :- 


1. Build the application :- mvn clean install


2. Run the application :- mvn spring-boot:run


 Now the service is running on tomcat port 8080 .Use the below URL to access the sayHello() api.

http://localhost:8080/hello