Showing posts with label REST API. Show all posts

Monday, September 7, 2026

HTTP GET Method: Explained with Examples and Best Practices

In the area of web application request & response are two major keys.The property of HTTP will remains universal over any programming language & platform, but here i mainly focus on Java/J2EE development.It means the response are related to each other.Normally the request is sent by client machine( browser ) and the response is revert back (sent back) to the client .Again for the response we need a clear idea about the content type ( MIME Type, Please read MIME TYPE in other post for more about content Type).

Key Points to remember about GET-
  1. 1. It has no Body, where as POST has Body.
  2. 2. It is Idempotent.
  3. 3. It is the default method in HttpServlet.In the Http servlet life cycle it is the default method.i.e. doGet().
  4. 4. It is not secure, because the data send by request line (URL) will visible on the browser.
  5. 5. The amount of data for send with request using get method  is very limited.

Below a HTML form like :-
 
<form action="servlet/MyServletTest" name="frmMyServlet" method="get">
        <input type="text" name="txtValue" />
        <input type="submit" value="Send Value" onclick="FunSendValue()"/>
    </form>
Note-

If method name will not mentioned then by default it will take GET method as default.But be aware about your servlet , there must be a doGet() method for your operation/request you are sending. The doGet() must be there inside your resource servlet.If no doGet() method found then it will generate an error - HTTP method GET is not Supported.

The doGet() method inside the servlet like below :-

MyServletTest.java

public class MyServletTest extends HttpServlet {      
    public void doGet(HttpServletRequest request, HttpServletResponse response)
            throws ServletException, IOException {

        response.setContentType("text/html");
        PrintWriter out = response.getWriter();
        String paramVal=request.getParameter("txtValue");
       
       
        out.println("<!DOCTYPE HTML PUBLIC \"-//W3C//DTD HTML 4.01 Transitional//EN\">");
        out.println("<HTML>");
        out.println("  <HEAD><TITLE>A Servlet</TITLE></HEAD>");
        out.println("  <BODY>");
        out.print("    This is ");
        out.print(this.getClass());
        out.println(", using the GET method");
        out.println("<h3> Your Value from JSP="+paramVal+"</h3>");       
        out.println("  </BODY>");
        out.println("</HTML>");
        out.flush();
        out.close();
    }

}


Like doGet() , there is doPost(), doPut(), doTrace(), doDelete() method for HTTP Servlet.The doGet() and doPost() methods are call by server ( via service method) for handling HTTP GET and POST requests.By extending HttpServlet ,here i have overrides the doGet() method for handle the request with GET method.
One more things to know is all Links,URL are the type GET in nature.

By default all links are handled by GET Method.Example :-
 
<a href="http://java.sun.com/j2ee?myval=I am Testing">Click here for

GET method Request</a> is a link with request type GET.


OR

 <a href="servlet/MyServletTest?txtValue=I am a Programmer">Click

here for GET method Request</a>
 

Note-

The term Idempotent ! It means GET can safely repeated.No need to change the request link but keep in mind that the HTTP GET and servlet doGet() methods are quite different.Let me clear that HTTP GET is
idempotent as per HTTP 1.1 Specification but servlet doGet() method is non-idempotent. It means you repeat the link again and again without changes inside servlet doGet() method, then it may generate error like "Bad Request". And one thing about idempotent is that , it does not mean that the same request has always same response/output and we don't mean that request has no side-effect.

Tuesday, July 2, 2019

Find Nearby Restaurants Using Google Places API

In the previous post we had seen how to get the current location (latitude and longitude) using java script.  Today we will use that functionality to get the nearby search using Google API.  We usually  do the search the near by restaurants , ATM, airport, book store , medicine store ,etc.  By the way we need this everyday in our daily life. 

We sometimes search the specific place or location by using the zipcode or pincode. Google API provide many features for Places, Routes and Map. Today we will find the nearest "resturants" by using a zip code or postcode. 

We have used google.maps.places and google.maps.geocoder in our example above. We have used geocoder , it is the process of converting addresses (like a street address) into geographic coordinates (like latitude and longitude), which you can use to place markers on a map, or position the map.


zipcodefind.html

<html>
<head>
        <style>
            html,
            body,
            #map-canvas {
                height: 100%;
                margin: 0px;
                padding: 0px
            }
        </style>
    <script
        src="https://maps.googleapis.com/maps/api/js?libraries=places&key=YOUR_API_KEY"></script>


    <script language="javascript">
        var map;
        var infowindow;
        function initialize() {
            var geocoder = new google.maps.Geocoder();
            var zipcode = document.getElementById('zipcode').value;
            geocoder.geocode({
                'address': zipcode, componentRestrictions: { country: 'IN' }
            }, function (results, status) {
                if (status === 'OK') {
                    var latLong = new google.maps.LatLng(results[0].geometry.location.lat(), results[0].geometry.location.lng());
                    console.log("Co-ordinates are::" + latLong);
                    map = new google.maps.Map(document.getElementById('map-canvas'), {
                        center: latLong,
                        zoom: 15
                    });
                    var request = {
                        location: latLong,
                        radius: 1000,
                        types: ['car_repair']
                    };
                    infowindow = new google.maps.InfoWindow();
                    var service = new google.maps.places.PlacesService(map);
                    service.nearbySearch(request, callback);
                } else {
                    alert('Search was not successful for the following reason: ' + status);
                }
            });
        }
        function callback(results, status) {
            if (status == google.maps.places.PlacesServiceStatus.OK) {
                for (var i = 0; i < results.length; i++) {
                    createMarker(results[i]);
                }
            }
        }
        function createMarker(place) {
            var placeLoc = place.geometry.location;
            var marker = new google.maps.Marker({
                map: map,
                position: place.geometry.location
            });
            google.maps.event.addListener(marker, 'click', function () {
                infowindow.setContent(place.name);
                infowindow.open(map, this);
            });
        }       
    </script>
</head>
<body>
    <div id="map-canvas" style="width: 50%; float:right"></div>
    <div style="width: 50%; float:left;padding-top: 20px;">
        <input id="zipcode" type="textbox" value="560078">
        <input id="submit" type="button" value="Get Nearby Search by Postcode" onclick="initialize()">
        <br>
        <span style="font-size: small">In this example we have used country <b>India</b>, and search type is <b>Resturants</b> </span>
    </div>
</body>
</html>


Now we will open this html file on browser as below screenshot. We have used marker for marking the near by place "resturants" for the given postcode. There are many supported place type google provides.


In this example we have restricted the search inside India. But there are other country codes i.e. AU which is also supported. 

componentRestrictions: { country: 'IN' }


Find few reference documents below:-


Thursday, March 15, 2018

How to Create Your First Spring Boot Application

Developing your first Spring Boot application is quite easy. As we know Spring Boot makes it easy to create stand-alone, production-grade Spring based Applications that you can "just run". Its basically to minimize the configuration. 

In this example I have used below frameworks and tools for this example.

1. Maven 3.3.9 
2. JDK 1.8
3. Eclipse IDE
4. spring-boot dependency 


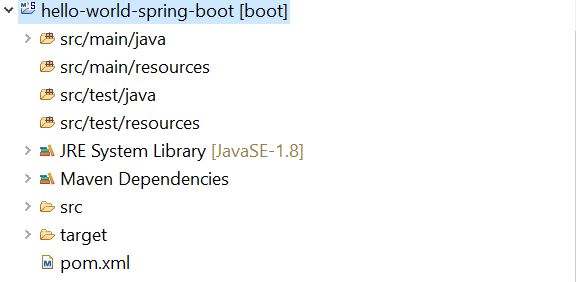
First step - In eclipse create a maven project  "hello-world-spring-boot" as below .


Then add the dependency for spring-boot and plug-in in the pom.xml file.


Pom.xml

<project xmlns="http://maven.apache.org/POM/4.0.0" xmlns:xsi="http://www.w3.org/2001/XMLSchema-instance"
xsi:schemaLocation="http://maven.apache.org/POM/4.0.0 http://maven.apache.org/xsd/maven-4.0.0.xsd">
<modelVersion>4.0.0</modelVersion>
<groupId>com.javadevelopersguide.www</groupId>
<artifactId>hello-world-spring-boot</artifactId>
<version>0.0.1-SNAPSHOT</version>
<description>This is a hello world example with Spring Boot.</description>
<parent>
<groupId>org.springframework.boot</groupId>
<artifactId>spring-boot-starter-parent</artifactId>
<version>1.5.10.RELEASE</version>
</parent>
<dependencies>
<dependency> <groupId>org.springframework.boot</groupId> <artifactId>spring-boot-starter-web</artifactId> </dependency> </dependencies>
<properties>
<java.version>1.8</java.version>
</properties>
<build>
<plugins>
<plugin>
<groupId>org.springframework.boot</groupId>
<artifactId>spring-boot-maven-plugin</artifactId>
</plugin>

</plugins>
</build>
</project>
Then create a controller class "HelloWorldController" with a rest api method sayHello()

HelloWorldController.java
package com.techbyteslearn.springboot.example;
import org.springframework.boot.autoconfigure.EnableAutoConfiguration;
import org.springframework.stereotype.Controller;
import org.springframework.web.bind.annotation.RequestMapping;
import org.springframework.web.bind.annotation.ResponseBody;

@Controller
@EnableAutoConfiguration
public class HelloWorldController {
@RequestMapping("/hello")
@ResponseBody
public String sayHello() {
return "Hello World Developer!!!";
}
}
I have use below annotations in my controller. Here in this example the uri path is /hello

@Controller - This is used to specify the controller , as its spring framework basic.
@EnableAutoConfiguration - This enable auto configuration for Application Context. 
@RequestMapping - This is used to map to spring mvc controller method.
@ResponseBody - Used to bind http response body with a domain object in return type.Its behind the scenes. 

Now , my controller is ready.Just I need a luncher , who can lunch my spring boot application. I have created a "SpringBootApplicationLuncher".

SpringBootApplicationLuncher.java


package com.techbyteslearn.springboot.example;
import org.springframework.boot.SpringApplication;

public class SpringBootApplicationLuncher {
public static void main(String[] args) {
SpringApplication.run(HelloWorldController.class, args);
}
}

Now you can run this launcher to start the spring boot application.Then, you can see the below screenshot showing the tomcat is started. As you know spring-boot is embedded with tomcat feature.


Now , your application is up and running . I have highlighted above that the tomcat is started on default port 8080

Try this tomcat URL, which is running now :- http://localhost:8080/hello


Alternatively , Also you can also start your spring-boot application on command line (Terminal). I have used windows OS.

You can use the below Maven Command  to build and run this spring-boot application :- 


1. Build the application :- mvn clean install


2. Run the application :- mvn spring-boot:run


 Now the service is running on tomcat port 8080 .Use the below URL to access the sayHello() api.

http://localhost:8080/hello

Friday, July 1, 2016

How to Test a Web Service Using cURL from the Command Line

How to test web service using command line curl.


How to test web service using command line curl, is a very often requirement.

This is always very easy to call the web service via a java client,  but sometimes we need to call the service using curl.

One thing you know ? its really very tactical to  call the web service from terminal/command line using curl command.


I have  steps with sample example :-


You need to know the below things before calling the service via curl.

Service Endpoint - The web service endpoint you want to call.

Example - http://myserverip.mycorpnet.com.au:16500/NaaSAutomation/NaaSManageService

Operation Name - The operation name , you want to execute.

Example - readProviderRequest

SoapAction - The soap action defined in WSDL.

Example - SOAPAction:/NaaSAutomation/Resources/WSDLs/ESB/Service/NaaSManageService-service0.serviceagent/NaaSManageServicePortEndpoint0/ManageProviderRead

Create sample valid request xml for sending to the service.

Request.xml
------------------

<soapenv:Envelope xmlns:soapenv="http://schemas.xmlsoap.org/soap/envelope/" xmlns:dto="http://dto.service.myservice.networkservice.test.service.mycorp.com.au/">
   <soapenv:Header/>
   <soapenv:Body>
      <dto:readProviderRequest>
         <callerIdentity>myIdentity</callerIdentity>
         <dto:ProviderName>techbyteslearn</dto:ProviderName>
      </dto:readProviderRequest>
   </soapenv:Body>
</soapenv:Envelope>

Curl Command :-

curl --header "Content-Type: text/xml;charset=UTF-8" --header "SOAPAction:/NaaSAutomation/Resources/WSDLs/ESB/Service/NaaSManageService-service0.serviceagent/NaaSManageServicePortEndpoint0/ManageProviderRead" --data @Request.xml http://myserverip.mycorpnet.com.au:16500/NaaSAutomation/NaaSManageService

Response got from Curl :-

<SOAP-ENV:Envelope xmlns:SOAP-ENV="http://schemas.xmlsoap.org/soap/envelope/">
   <SOAP-ENV:Body>
      <ns0:ManageProviderCreateRes xmlns:ns0="http://www.mycorpnet.com.au/NaaSAutomation/Resources/Schemas/CreateRequest.xsd">
         <ns0:response>
            <ns0:providerName>techbyteslearn</ns0:providerName>
            <ns0:createStatus>SUCCESS</ns0:createStatus>
            <ns0:rollbackInitiated>TRUE</ns0:rollbackInitiated>
         </ns0:response>
      </ns0:ManageProviderCreateRes>
   </SOAP-ENV:Body>
</SOAP-ENV:Envelope>