Showing posts with label Maven. Show all posts

Monday, September 7, 2026

How to Skip Integration Tests in Maven but Run Unit Tests

How to Skip Integration Tests in Maven but Execute Unit Tests

It was not so easy when I was trying all the possible options and lost 3 hours of my valuable time. It is really very frustrating when you are trying to do something and it is not happening within your expected time.

This happened to me when I was trying to build the project without executing the integration tests. My scenario was to skip only the integration tests, but the unit test cases must still be executed.

I Googled almost many links, but had no luck. Finally, the solution worked for me with the below pom.xml configuration.

Add the below tag into your pom.xml:

<build> <plugins> <plugin> <groupId>org.apache.maven.plugins</groupId> <artifactId>maven-surefire-plugin</artifactId> <version>2.18.1</version> <configuration> <excludes> <exclude>**/*IntegrationTest.java</exclude> </excludes> </configuration> </plugin> </plugins> </build>

Here you can use the <exclude> tag and mention any test class pattern that you want to skip.

For example, if your Java class name contains ITest.java (i.e. MyMethodITest.java):

<exclude>**/*IT*.java</exclude>

Or:

<exclude>**/*AnyTestClasses.java</exclude>

Not only integration tests, you can skip any test classes using the <exclude> tag, but you need to configure the pom.xml properly.

In the Maven command, you can use the normal command as below:

mvn clean install

Note: Be careful about the plugin version because the configuration may behave differently with different versions. Make sure the version you are using supports the configuration you need.


How to Install and Configure SonarQube on Linux (Ubuntu)

Its really very important to maintain the code quality as a developer. Sonar is an open platform to manage code quality.  

How to configure Sonar ?

Its really not very easy, but bit tricky. Follow the below steps to configure the your local machine. I have used Linux (Ubuntu) machine to do this setup.

Download the Sonar. I have downloaded the verion sonar-3.7.3.
 
Then unzip the downloaded file and go to the /bin directory. You can go to any of the below folders as per your machine architecture.


dev@xxx-developer bin # ls -ltr
total 44
drwxrwxrwx 3 root java 4096 Oct  9 11:51 linux-x86-32
drwxrwxrwx 3 root java 4096 Oct  9 11:51 macosx-universal-32
drwxrwxrwx 3 root java 4096 Oct  9 11:51 solaris-sparc-64
drwxrwxrwx 3 root java 4096 Oct  9 11:51 windows-x86-32
drwxrwxrwx 3 root java 4096 Oct  9 11:51 solaris-sparc-32
drwxrwxrwx 3 root java 4096 Oct  9 11:51 linux-ppc-64
drwxrwxrwx 2 root java 4096 Oct  9 11:51 jsw-license
drwxrwxrwx 3 root java 4096 Oct  9 11:51 macosx-universal-64
drwxrwxrwx 3 root java 4096 Oct  9 11:51 windows-x86-64
drwxrwxrwx 3 root java 4096 Oct  9 11:51 solaris-x86-32
drwxrwxrwx 3 root java 4096 Oct 23 00:04 linux-x86-64

Here I am using 64bit linux, so I am using linux-x86-64.

/usr/java/sonar-3.7.3/bin/linux-x86-64

Now, start the Sonar.
dev@xxx-developer linux-x86-64 # ./sonar.sh start
Starting sonar...
Removed stale pid file: /usr/java/sonar-3.7.3/bin/linux-x86-64/./sonar.pid
Started sonar.
dev@xxx-developer linux-x86-64 # pwd
/usr/java/sonar-3.7.3/bin/linux-x86-64

Now check on the browser for whether sonar is running on not.

http://localhost:9001/


Normally it runs over 9001 port always. You can also configure this port  /conf folder.

/usr/java/sonar-3.7.3/conf/sonar.properties

#---------------------------------------------------------
# WEB SETTINGS - STANDALONE MODE ONLY
# These settings are ignored when the war file is deployed to a JEE server.
#---------------------------------------------------------
# Listen host/port and context path (for example / or /sonar). Default values are 0.0.0.0:9000/.
#sonar.web.host:                           0.0.0.0
sonar.web.port:                           9001


You can check the status for sonar is running or not .

dev@xxx-developer linux-x86-64 # ./sonar.sh status

sonar is running (20135).


Maven Settings :-

Setting in Maven settings.xml :-

      <profile>
        <id>sonar</id>
        <activation>
            <activeByDefault>true</activeByDefault>
        </activation>
        <properties>
                    <sonar.host.url>http://localhost:9001</sonar.host.url>
        </properties>
    </profile>


This above maven setting is required if you want to run the sonar from maven build. While building the maven project from terminal as sample below :

dev@xxx-developer ~/lar_rollback_service $ mvn clean install sonar:sonar 


Project Specific Report :-

Code Coverage Report :-

Hope it will help you. Happy and quality development.


How to Skip Test Cases in Maven Build

You can skip the test in two following ways :-

By configuring the Pom.xml , if you are using surefire plugin then you can configure as below. 


<build>
    <plugins>
      <plugin>
        <groupId>org.apache.maven.plugins</groupId>
        <artifactId>maven-surefire-plugin</artifactId>
        <version>2.18</version>
        <configuration>
          <skipTests>true</skipTests>
        </configuration>
      </plugin>
    </plugins>

  </build>

For specific module test you can create profile in pom.xml for specific environment and it will help to skip the test cases.You can skip this specified profile "noTest".

<profiles>
    <profile>
      <id>noTest</id>
      <activation>
        <property>
          <name>noTest</name>
          <value>true</value>
        </property>
      </activation>
      <build>
        <plugins>
          <plugin>
            <groupId>org.apache.maven.plugins</groupId>
            <artifactId>maven-surefire-plugin</artifactId>
            <version>2.4.2</version>
            <configuration>
              <skipTests>true</skipTests>
            </configuration>
          </plugin>
        </plugins>
      </build>
    </profile>
  </profiles>

By using Command Line :- 


1) -Dmaven.test.skip=true

2) -DskipTests ( The values can be true/false) 

Example - 


1 ) mvn clean install -DskipTests=true

2 ) mvn clean install -Dmaven.test.skip=true

How to Create a Maven Job in Jenkins

As we know Jenkins is a tool  , and its used for build and release any project.There are many such tools are available i.e. Hudson.  For creating job/project on Jenkins below steps/screen shots need to follow.

Step 1 - Login & Dashboard

Login to Jenkins with valid credential and you are in Dashboard.


Step 2 - Create Job

Click New Item (left side menu) to create a new Job/Project . Provide the Job Name as per your project requirement. Here this example my job name is "HelloWorld_Job".


Here in the above image many options are available for creating many kind of job. Also you can copy any existing job instead of creating a new. You can select Copy Existing Items and provide the existing job name inside the text box.


Step 3 - Job Configuration


There are few certain configuration is required for this job execution. For building any job we need few configuration and commands as below.


You need to configure the source code location from which you are going to build.In the below image I have used "Git" as source code management tool. You can use any source code management tool like SVN, CVS ,etc. And the important part of this configuration is the location of your project . So, make your the location you have provided is correct and relevant.


Then  there are few more setup is required make this job elegant and accurate. But these options/settings are fully optional. Read all the settings carefully and configure as per you needs.Some useful configurations as below.


As the part of configuration the major part is maven command for execute the build. The screen shot below shows the configuration about maven command for goal. This project is a maven project and we need maven command for build this job/project. 


Common maven commands which is used for a clean build is "mvn clean install". Also there are many other additional commands which will help you to achieve your goal.Read more here about Maven.


Step 4 - Start Build 


The final step is to start the build. Once all the above steps are completed and you are ensure about the configuration , then you can do the build . The build execution will provide you the artifacts i.e. jar ,war,ear, etc.


 If the job execution is success, the you can go for deployment. Now you are done with this job.


Enjoy the Build and Release process.

Tuesday, June 25, 2019

Deploying Spring Boot Microservice to Docker - A Quick Guide

In this article we will deploy our spring boot micro service into docker. In our previous article we had created a simple "Hello World" spring boot micro service. Now, we will deploy that application into Docker. Check how to create a spring boot micro service

Docker with spring boot is the current popular technology stack which enables organization to seamlessly develop and make production ready artifacts. If you want to learn more about docker, read more here. 


Before deploying the application into docker,  make sure you have installed the docker. In this example we have used Docker Community Edition ( Docker CE) on windows OS. How to install docker on Windows/MacOS/Linux. We can also use Alpine Linux image , it provide minimal Linux environment to deploy & run the application.There are few docker commands to manage your application. Below sample command and screen shot shows to check the version of your installed docker engine. 

Command - 
     docker --version


What we need to deploy a spring boot application in Docker? 
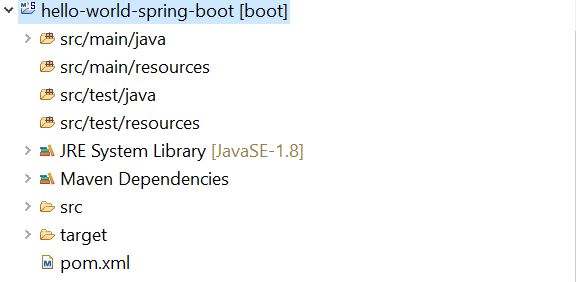
  • First, we need to create an Image file for our application. Docker image is a most important component for docker engine. Docker provides a docker hub, its an library and community for container images. We can use docker hub to get the most common images .  In the below project structure , we have created a "Dockerfile.txt". If you put this docker file into the class path, then docker engine will automatically identify and load this file. This docker file name is very sensitive, so you must follow the naming convention as mentioned in the below screen shot. Docker reads commands/instructions from "Dockerfile.txt" and build the image. 

The below docker file contains the commands to create the image. Actually there are many commands used for different purpose. Here we have used few commands as per our needs.


    • FROM  - Must be the first non-comment instruction in the Dockerfile. This command creates layer from the docker image. In our case we have used java:8, It means this application will run on java 8.
    • EXPOSE - Exposing port for the endpoint. In this example we have configure 8080.
    • ADD - This command helps to takes a source and destination. Normally source is your local copy. COPY command also does same thing , but there is small difference between COPY & ADD command.
    • ENTRYPOINT - Its similar to CMD, where our command/jar file will be executed.
    • There are many other commands for creating docker image. Read more about docker command.


  • Now , run the command to build the image and deploy into docker. Before running the docker command we need to create the .jar file. Because, we are creating a jar file and then creating the jar file as docker image. So, here we have used mvn clean install command to create the jar file.

Creating a jar file. Below maven command is used to create the jar file.
     clean install 


Now , we can see below the .jar file has been created.


Create a docker image file. Below command is used to create the image file.

Syntax - docker build -t <image file name> <destination directory>

docker build -t sample-hello-microservice-springboot .


As per the above screenshot, it seems we have created the docker image successfully. You can check the created image by using command "docker images".

docker images


Now, our image file is ready. We can push this image to docker container using below command .

Syntax - docker run -p <exposed port> -t <image file name>

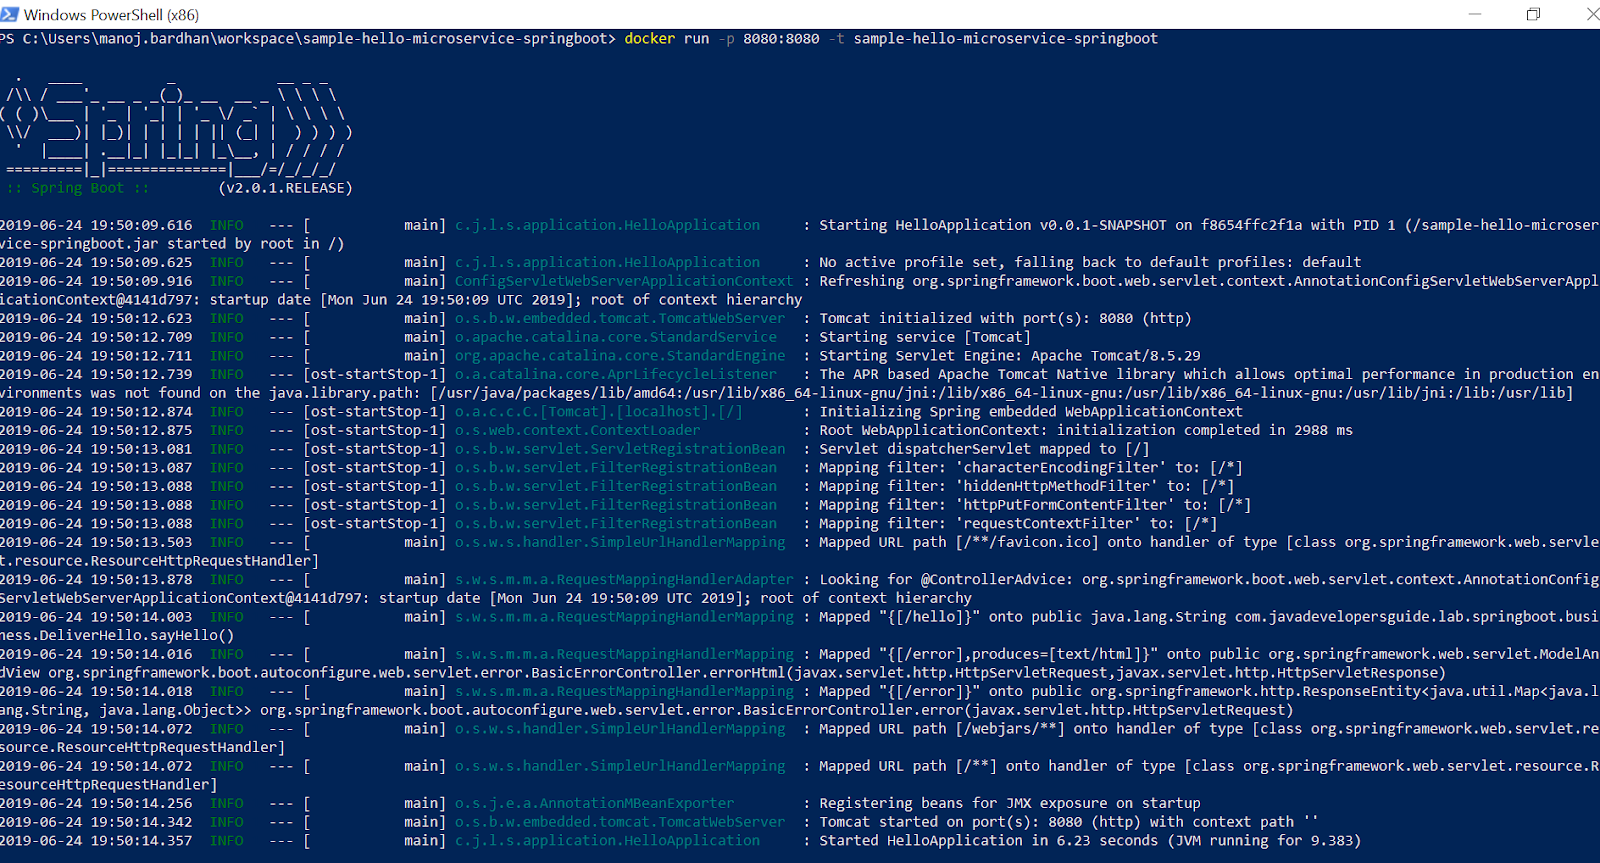
docker run -p 8080:8080 -t sample-hello-microservice-springboot


Now our micro service has been deployed to docker and its exposed on port 8080 as per our configuration in the docker file. We can check the running container and its status.


Now we can also accessed from browser as below.

There are few useful docker command as below .

docker system prune 

This will remove:                                                                                                                               - all stopped containers
       - all networks not used by at least one container
       - all dangling images     
       - all dangling build cache 

docker ps -a 

This will show all process in docker engine.

docker images

This will show all the images you created.

docker stop <container id>

This will stop the container.

If required , there are help options to get the help about each command. Read more.
docker ps --help
docker run --help


Hope it will help you.


Monday, June 17, 2019

Spring Boot JAR Error: No Main Manifest Attribute

The error "no main manifest attribute, in sample-hello-microservice-springboot.jar" occurred while trying to execute the JAR file.

This was an unusual issue with JAR file execution. In this case, I was trying to run the Docker image. The reason for this issue was that, during JAR execution, it was not able to locate the main class.

Below is the main class, HelloApplication, and the pom.xml file. It seems that the Spring Boot Maven plugin was missing, along with the configuration for the manifest (mainClass).

HelloApplication.java

package com.techbyteslearn.lab.springboot.application;

import org.springframework.boot.SpringApplication;
import org.springframework.boot.autoconfigure.SpringBootApplication;

@SpringBootApplication
public class HelloApplication {

    public static void main(String[] args) {
        SpringApplication.run(HelloApplication.class, args);
    }
}

pom.xml

<project xmlns="http://maven.apache.org/POM/4.0.0" xmlns:xsi="http://www.w3.org/2001/XMLSchema-instance" xsi:schemaLocation="http://maven.apache.org/POM/4.0.0 http://maven.apache.org/xsd/maven-4.0.0.xsd"> <modelVersion>4.0.0</modelVersion> <groupId>sample-hello-microservice-springboot</groupId> <artifactId>sample-hello-microservice-springboot</artifactId> <version>0.0.1-SNAPSHOT</version> <description>Sample Hello microservice with Spring Boot.</description> <parent> <groupId>org.springframework.boot</groupId> <artifactId>spring-boot-starter-parent</artifactId> <version>2.0.1.RELEASE</version> </parent> <dependencies> <!-- Setup Spring Boot --> <dependency> <groupId>org.springframework.boot</groupId> <artifactId>spring-boot-starter</artifactId> </dependency> <!-- Setup Spring MVC & REST with Embedded Tomcat --> <dependency> <groupId>org.springframework.boot</groupId> <artifactId>spring-boot-starter-web</artifactId> </dependency> </dependencies> <build> <sourceDirectory>src</sourceDirectory> <plugins> <plugin> <artifactId>maven-compiler-plugin</artifactId> <version>3.5.1</version> <configuration> <source>1.8</source> <target>1.8</target> </configuration> </plugin> <plugin> <groupId>org.springframework.boot</groupId> <artifactId>spring-boot-maven-plugin</artifactId> <configuration> <archive> <manifest> <mainClass> com.techbyteslearn.lab.springboot.application.HelloApplication </mainClass> </manifest> </archive> </configuration> </plugin> </plugins> </build> </project>

Solution:

I added the Spring Boot Maven plugin and configured the main class in the pom.xml file.

After making this change, the JAR was created with the required manifest information, and the application started working fine when the JAR was executed.

You can see the screenshot below to see the result.


Checking on browser.


Hope this will help you. 

Thursday, March 15, 2018

How to Create Your First Spring Boot Application

Developing your first Spring Boot application is quite easy. As we know Spring Boot makes it easy to create stand-alone, production-grade Spring based Applications that you can "just run". Its basically to minimize the configuration. 

In this example I have used below frameworks and tools for this example.

1. Maven 3.3.9 
2. JDK 1.8
3. Eclipse IDE
4. spring-boot dependency 


First step - In eclipse create a maven project  "hello-world-spring-boot" as below .


Then add the dependency for spring-boot and plug-in in the pom.xml file.


Pom.xml

<project xmlns="http://maven.apache.org/POM/4.0.0" xmlns:xsi="http://www.w3.org/2001/XMLSchema-instance"
xsi:schemaLocation="http://maven.apache.org/POM/4.0.0 http://maven.apache.org/xsd/maven-4.0.0.xsd">
<modelVersion>4.0.0</modelVersion>
<groupId>com.javadevelopersguide.www</groupId>
<artifactId>hello-world-spring-boot</artifactId>
<version>0.0.1-SNAPSHOT</version>
<description>This is a hello world example with Spring Boot.</description>
<parent>
<groupId>org.springframework.boot</groupId>
<artifactId>spring-boot-starter-parent</artifactId>
<version>1.5.10.RELEASE</version>
</parent>
<dependencies>
<dependency> <groupId>org.springframework.boot</groupId> <artifactId>spring-boot-starter-web</artifactId> </dependency> </dependencies>
<properties>
<java.version>1.8</java.version>
</properties>
<build>
<plugins>
<plugin>
<groupId>org.springframework.boot</groupId>
<artifactId>spring-boot-maven-plugin</artifactId>
</plugin>

</plugins>
</build>
</project>
Then create a controller class "HelloWorldController" with a rest api method sayHello()

HelloWorldController.java
package com.techbyteslearn.springboot.example;
import org.springframework.boot.autoconfigure.EnableAutoConfiguration;
import org.springframework.stereotype.Controller;
import org.springframework.web.bind.annotation.RequestMapping;
import org.springframework.web.bind.annotation.ResponseBody;

@Controller
@EnableAutoConfiguration
public class HelloWorldController {
@RequestMapping("/hello")
@ResponseBody
public String sayHello() {
return "Hello World Developer!!!";
}
}
I have use below annotations in my controller. Here in this example the uri path is /hello

@Controller - This is used to specify the controller , as its spring framework basic.
@EnableAutoConfiguration - This enable auto configuration for Application Context. 
@RequestMapping - This is used to map to spring mvc controller method.
@ResponseBody - Used to bind http response body with a domain object in return type.Its behind the scenes. 

Now , my controller is ready.Just I need a luncher , who can lunch my spring boot application. I have created a "SpringBootApplicationLuncher".

SpringBootApplicationLuncher.java


package com.techbyteslearn.springboot.example;
import org.springframework.boot.SpringApplication;

public class SpringBootApplicationLuncher {
public static void main(String[] args) {
SpringApplication.run(HelloWorldController.class, args);
}
}

Now you can run this launcher to start the spring boot application.Then, you can see the below screenshot showing the tomcat is started. As you know spring-boot is embedded with tomcat feature.


Now , your application is up and running . I have highlighted above that the tomcat is started on default port 8080

Try this tomcat URL, which is running now :- http://localhost:8080/hello


Alternatively , Also you can also start your spring-boot application on command line (Terminal). I have used windows OS.

You can use the below Maven Command  to build and run this spring-boot application :- 


1. Build the application :- mvn clean install


2. Run the application :- mvn spring-boot:run


 Now the service is running on tomcat port 8080 .Use the below URL to access the sayHello() api.

http://localhost:8080/hello

Monday, October 5, 2015

Jenkins Maven Error: Unknown Lifecycle Phase "mvn"


[ERROR] Unknown lifecycle phase "mvn" You must specify a valid lifecycle phase or a goal in the format.

This Jenkins issue is very common, while configuring the maven job in Jenkins. One of my peer faced this issue during her development. Then we investigate and fixed this issue.


Jenkins Configuration :-


Error Log :-

[INFO] BUILD FAILURE
[INFO] ------------------------------------------------------------------------
[INFO] Total time: 1.316 s
[INFO] Finished at: 2015-10-05T15:10:46+11:00
[INFO] Final Memory: 20M/491M
[INFO] ------------------------------------------------------------------------
[ERROR] Unknown lifecycle phase "mvn". You must specify a valid lifecycle phase or a goal in the format <plugin-prefix>:<goal> or <plugin-group-id>:<plugin-artifact-id>[:<plugin-version>]:<goal>. Available lifecycle phases are: validate, initialize, generate-sources, process-sources, generate-resources, process-resources, compile, process-classes, generate-test-sources, process-test-sources, generate-test-resources, process-test-resources, test-compile, process-test-classes, test, prepare-package, package, pre-integration-test, integration-test, post-integration-test, verify, install, deploy, pre-clean, clean, post-clean, pre-site, site, post-site, site-deploy. -> [Help 1]
[ERROR]
[ERROR] To see the full stack trace of the errors, re-run Maven with the -e switch.
[ERROR] Re-run Maven using the -X switch to enable full debug logging.
[ERROR]
[ERROR] For more information about the errors and possible solutions, please read the following articles:
[ERROR] [Help 1] http://cwiki.apache.org/confluence/display/MAVEN/LifecyclePhaseNotFoundException
[JENKINS] Archiving /opt/jenkins_dev/workspace/MYAPP_BIZ/pom.xml to au.com.mycompany.group.lar.testing.biz/Myapp/0.0.1-SNAPSHOT/Myapp-0.0.1-SNAPSHOT.pom
channel stopped
Started calculate disk usage of build
Finished Calculation of disk usage of build in 0 seconds
Started calculate disk usage of workspace
Finished Calculation of disk usage of workspace in 0 seconds
Finished: FAILURE


Solution :-

Its a simple mistake, that while configuring the jenkins jobs maven goal, we are simple trying with mvn clean install  , which is a against maven life cycle policy.

So , we fixed this by removing the mvn  . Correct command is clean install. Then it worked.