Showing posts with label MYSQL. Show all posts

Monday, September 7, 2026

MySQL: How to Split a String by Delimiter using SUBSTRING_INDEX

String operation with MYSQL database is quite simple. But some times it found very ridiculous to find a expected result.That exactly happens with me. Actually I was expecting the result like below :-
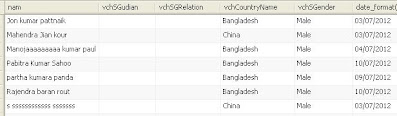


But when I run my query it generates the out put like below:-



But i want only the name before the first comma(,) occurrence like :-

 Jon kumar Pattnaik from first row.

To find the expected result from database I have used SUBSTRING_INDEX(str,delim,index count) method.A string operation method .

Query :-

select SUBSTRING_INDEX(GROUP_CONCAT(s.vchSName,' ',vchMidName,' ',vchLastName),',',1) as nam,vchSGudian,vchSGRelation  from t_emp_details ;


Now its running fine with a good expected result.


SUBSTRING_INDEX(str,delim,index count)

Notes :- Parameters

str- is the main string from which we need to find the substring.
delim- is the separator of main string.
index count- is the number of separator you want to find.

Example:-
You,are,a,programmer.

select SUBSTRING_INDEX( 'You,are,a,programmer',',',1) from myTable;

 
Out put:- You

Here in the above query :-

You,are,a,programmer.--( Main String)
comma (,) -- (Separator or delim)
1 --(Index Count)


Combining Rows in MySQL: A Practical Guide to GROUP_CONCAT()

GROUP_CONCAT() is one the most essential function over many areas of software development.The basic purpose of this function is to concatenate all records/rows/tuples of a single column/field into a single string.MYSQL library provides huge amount of function with huge requirement of clients.

Suppose:-

select vchDay from m_days_list


A column has these following records


After use GROUP_CONCAT() the output like below-


Query :-
select GROUP_CONCAT(vchDay) from m_days_list


GROUP_CONCAT() not only working on single column , but it also working on multiple column/field.And the results are also similar as single column.It gives higher operating value than GROUP BY clause.

select GROUP_CONCAT(vchDay,vchMonth) from m_days_list

Output:-

FridayJanuary,MondayFebruary,SaturDayMarch


MySQL: Schedule Automatic Database Backup on Windows

Quite simple. Since you have already read my older post about creating a backup (dump) file, here we will see how to automatically take a backup of a MySQL database at a particular time on your local Windows system.

This can be done using a batch file and Windows Task Scheduler.

Steps to create a scheduled backup:

Step 1: Create a batch file with the mysqldump command and the required options, as mentioned in the old post.

Step 2: Open Windows Task Scheduler.

You can search for Task Scheduler from the Windows Start menu.

Step 3: Create a new task or basic task and configure it to run the batch file at the required date and time.

After completing the configuration, wait for the scheduled time and check the destination directory. If everything is configured correctly, the MySQL backup file should be created automatically.

MySQL: How to Store Multilingual & Special Character Data Using UTF-8

Every now and then, client requirements demand storing multilingual text, Arabic scripts, or special characters in a MySQL database. If the database encoding isn't configured properly, you end up with garbled text or question marks (???).

I ran into this exact issue recently on a client project. The fix is straightforward once you configure the right character set and collation.

Here is how to set up your tables and columns to handle multilingual data properly, either through a GUI or direct SQL queries.

Method 1: Using MySQL GUI (Workbench / phpMyAdmin)

  1. Table Collation: Set the table collation to utf8 (or utf8mb4) with utf8_bin (or utf8mb4_bin).

  2. Column Collation: Ensure each text column (VARCHAR, TEXT) is explicitly set to use utf8 character set and utf8_bin collation.

  3. Save Changes: Apply the updates to your schema.


  • [utf-8-table-setting.jpg] – Setting table-level collation

  • [utf-8-to-column.jpg] – Setting column-level collation

  • [data-in-table.jpg] – Multilingual data successfully stored inside the table


Method 2: Using SQL Queries

If you prefer running SQL scripts directly or need to alter existing tables, use the queries below.

Set Collation at Column and Table Creation

CREATE TABLE example_multilingual (
    id INT AUTO_INCREMENT PRIMARY KEY,
    user_name VARCHAR(100) CHARACTER SET utf8 COLLATE utf8_bin,
    notes TEXT CHARACTER SET utf8 COLLATE utf8_bin
) DEFAULT CHARSET=utf8 COLLATE=utf8_bin;


Alter Existing Columns

If your table already exists and you need to update existing columns to support special character sets:

 ALTER TABLE `admin_kairali`.`t_report_language` 
    CHANGE COLUMN `vchBeing` `vchBeing` VARCHAR(200) CHARACTER SET 'utf8' COLLATE 'utf8_bin' NULL DEFAULT NULL,
    CHANGE COLUMN `vchScrtry` `vchScrtry` VARCHAR(200) CHARACTER SET 'utf8' COLLATE 'utf8_bin' NULL DEFAULT NULL,
    CHANGE COLUMN `vchAccount` `vchAccount` VARCHAR(200) CHARACTER SET 'utf8' COLLATE 'utf8_bin' NULL DEFAULT NULL,
    CHANGE COLUMN `vchReceiversign` `vchReceiversign` VARCHAR(4000) CHARACTER SET 'utf8' COLLATE 'utf8_bin' NULL DEFAULT NULL;


Quick Tip: For modern MySQL setups (MySQL 5.7+ and MySQL 8.0+), consider using utf8mb4 with utf8mb4_unicode_ci or utf8mb4_bin instead of standard utf8, as utf8mb4 fully supports 4-byte characters like emojis and complex scripts.


MySQL: Find All Foreign Key Constraints in a Database

It was frustrating when I struggled to find all the foreign keys in my MySQL database. My project manager kept asking for them, so when I finally figured it out, it was a huge relief and a great moment!

While this is straightforward in MS SQL Server, doing it in MySQL can be tricky if you don't know where to look. I'm sharing this snippet here to help other developers quickly pull this information.

Run these queries in your MySQL query editor:

1. Find Foreign Keys for a Specific Schema (Database) and Table


SELECT 
    f.table_schema AS 'schema',
    f.table_name AS 'table',
    f.column_name AS 'column',
    f.constraint_name AS 'constraint_name',
    f.referenced_table_name AS 'referenced_table',
    f.referenced_column_name AS 'referenced_column'
FROM 
    information_schema.KEY_COLUMN_USAGE f
WHERE 
    f.table_schema = 'admin_kairali' 
    AND f.referenced_column_name IS NOT NULL; 


 Note: If you want to filter down to a single specific table, add AND f.table_name = 'your_table_name' to the WHERE clause.

2. Find All Foreign Keys Across the Entire Server

 
SELECT 
    f.table_schema AS 'schema',
    f.table_name AS 'table',
    f.column_name AS 'column',
    f.constraint_name AS 'constraint_name',
    f.referenced_table_name AS 'referenced_table',
    f.referenced_column_name AS 'referenced_column'
FROM 
    information_schema.KEY_COLUMN_USAGE f
WHERE 
    f.referenced_column_name IS NOT NULL;


Saturday, September 5, 2026

MySQL: Understanding Storage Engines and InnoDB Status

I faced this problem when I was trying to find information about the engines inside MySQL DB. It is quite easy to work with MySQL, but the engines inside MySQL are also interesting. The information about the engines can be found by using the following commands in the query editor or console:

SHOW ENGINE INNODB STATUS;

The above query/command will help you find information about the InnoDB engine. Here, I have used INNODB in the query.

SHOW ENGINES;

The above query/command will help you find the available storage engines in your MySQL installation and some information about them.

The output can be different depending on the MySQL version and configuration. For example, you may see engines such as:

InnoDB MyISAM MEMORY CSV ARCHIVE BLACKHOLE

InnoDB is the default storage engine in current MySQL releases. It supports transactions, row-level locking, foreign keys, and crash recovery.

If you want to check the storage engine used by a particular table, you can use:

SHOW TABLE STATUS LIKE 'table_name';

The Engine column in the output shows the storage engine used by that table.

SHOW ENGINE INNODB STATUS is useful when you need detailed information about the current internal status of InnoDB. It can provide information about transactions, locks, semaphores, buffer pool activity, and other InnoDB information.

The SHOW ENGINES command is useful for checking which storage engines are available in your MySQL installation.

The list of available engines can be different depending on the MySQL version and configuration. Therefore, it is better to check the output from your own MySQL installation instead of relying on an old list of engines.

[Read more about MySQL storage engines and internal commands in the MySQL documentation.]


MySQL Security: SQL Injection and Password Security

When developing applications with MySQL, security should be considered carefully, especially when handling login credentials and user input.

One common security problem is SQL Injection. It can occur when an application directly adds user input to an SQL query instead of using parameterized queries or prepared statements.

Developers should be careful when creating login or validation queries, especially when user input is directly added to an SQL query.

Anyone using MySQL in an application should be aware of common security mistakes, especially when handling login credentials.

For example, a login query may contain a condition like:

WHERE BINARY pass = 'yourpassword'

The WHERE clause itself is not the security problem. The problem occurs when an application directly adds user input to the SQL query.

If user input is concatenated directly into an SQL statement, an attacker may be able to manipulate the SQL condition and bypass the intended validation. This is known as SQL Injection.

Therefore, do not construct SQL queries by directly concatenating username, password, or other user-provided values. Always use parameterized queries or prepared statements.

For example, instead of creating an SQL statement by adding the username and password directly to the query, the application should use a prepared statement and pass these values as parameters.

This keeps the SQL statement separate from the user-provided values and helps prevent SQL Injection.

Password Security

Password security is also an important part of application security.

Do not store application passwords as plain text. Also, do not use HEX() or MD5() as a replacement for proper password security.

HEX() only converts data into hexadecimal representation. It does not provide password protection.

MD5 is also not suitable for securely storing passwords. Passwords should be stored using a proper password-hashing mechanism provided by the application framework or security library.

Some MySQL Security Best Practices

Some basic security practices to follow when working with MySQL are:

  1. Always use parameterized queries or prepared statements.

  2. Never store application passwords as plain text.

  3. Do not store database credentials directly in source code.

  4. Avoid storing passwords or sensitive information in application logs.

  5. Give database users only the permissions they require.

  6. Use secure connections where required.

  7. Keep MySQL and related software updated.

  8. Avoid exposing the MySQL server directly to the public Internet unless it is properly secured.

Always follow the official MySQL security documentation when implementing security for your application and database.


Friday, September 4, 2026

MySQL: Create Database Backup Using a Windows Batch File

Creating a complete solution in MySQL can sometimes be challenging, especially when you are looking for a specific administration or backup requirement.

I faced this situation several times while working with my development team. One of my colleagues asked me how to create MySQL database dumps using a batch file so that the backup could be executed easily from Windows.

I had already written about creating MySQL dumps using the command line, but this time I needed to automate the process using a Windows batch file.

After preparing the batch file and testing it successfully, I thought it would be useful to share the approach here.

Create the Batch File

Create a new file with a .bat extension, for example:

mysql_backup.bat

Add the following commands to the file:

cd "C:\Program Files\MySQL\MySQL Server\bin" mysqldump -hlocalhost -uroot -p testDB1 > D:\mybackupdumps.sql exit

Replace the following values according to your environment:

  • localhost — MySQL server host
  • root — MySQL username
  • testDB1 — database name
  • D:\mybackupdumps.sql — location and name of the backup file

When the batch file runs, mysqldump will prompt for the MySQL password.


Note: Avoid putting the MySQL password directly in the batch file because the file may be accessible to other users or applications.

Backup a Database on a Remote Server

You can also specify the MySQL server hostname or IP address using the -h option:

cd "C:\Program Files\MySQL\MySQL Server\bin" mysqldump -h192.168.1.100 -umyuser -p mydatabase > D:\mybackup.sql exit

Replace the host, username, database name, and output path with your actual values.

Backup All Databases

If you want to create a dump containing all databases accessible to the MySQL user, use the --all-databases option:

cd "C:\Program Files\MySQL\MySQL Server\bin" mysqldump -hlocalhost -umyuser -p --all-databases > D:\myalldatabases.sql exit

Useful mysqldump Options

mysqldump provides many options that can be used to control how the dump is created. Some commonly used options include:

--add-locks
Adds LOCK TABLES and UNLOCK TABLES statements around table dumps.

--all-databases
Dumps all databases.

--comments
Includes comments in the dump file.

--compact
Produces a more compact dump output by reducing some additional statements and comments.

--ignore-table=db_name.table_name
Excludes the specified table from the dump.


Final Note

A Windows batch file makes it easier to repeat a database backup command without manually typing it each time. It can also be used as part of a scheduled backup process using Windows Task Scheduler.

The exact MySQL installation path may differ depending on the MySQL version and how it was installed, so update the cd path accordingly.


MySQL: Create a Database Backup Using mysqldump

When working with MySQL, there may be situations where you need to create a backup or dump file of your database.

The mysqldump utility can be used to export a MySQL database into a SQL dump file. The dump can then be used to restore the database on another MySQL server.

Step 1: Open the MySQL bin Directory

Go to the bin directory of your MySQL installation.

For example, on Windows:

C:\Program Files\MySQL\MySQL Server\bin

The exact path may be different depending on your MySQL version and installation location.

Step 2: Run the mysqldump Command

Open Command Prompt and run:

mysqldump -u your_username -p your_databasename > D:\mybackup.sql

You will be prompted to enter the MySQL password.

For example:

mysqldump -u root -p testdb > D:\mybackup.sql

Step 3: Check the Backup File

After the command completes successfully, check the specified location:

D:\mybackup.sql

The file contains the SQL statements required to recreate the database objects and data.

Important Note

The mysqldump command should be run against a MySQL server compatible with the dump format. When moving a database between different MySQL versions or environments, it is a good idea to test the dump by restoring it on the target server before relying on it as a production backup.

Java MySQL: Get the Last Inserted ID Using JDBC

I have faced many questions and problems related to retrieving the ID of the last inserted record when using MySQL as the backend.

When a table has an auto-increment primary key, we may need to retrieve the generated ID immediately after inserting a record.

In Java JDBC, this can be done using Statement.RETURN_GENERATED_KEYS and getGeneratedKeys().

Example

String query = "INSERT INTO m_time_list " +
               "(vchTime, vchGMT, createdDate) " +
               "VALUES (?, ?, CURDATE())";

PreparedStatement pstmt =
        connection.prepareStatement(query, Statement.RETURN_GENERATED_KEYS);

pstmt.setString(1, form.getTxtTime());
pstmt.setString(2, form.getRdbgmt());

pstmt.executeUpdate();

ResultSet rs = pstmt.getGeneratedKeys();

int sid = 0;

if (rs.next()) {
    sid = rs.getInt(1);
}

System.out.println("Generated ID: " + sid);

After the insert is executed, sid contains the generated auto-increment ID.

Using MySQLLAST_INSERT_ID()

MySQL also provides the LAST_INSERT_ID() function for obtaining the automatically generated ID.

SELECT LAST_INSERT_ID();

For Java applications using JDBC, however, Statement.RETURN_GENERATED_KEYS with getGeneratedKeys() is generally a convenient way to retrieve the generated key directly from the insert operation.


Note: Use PreparedStatement parameters rather than concatenating user-provided values directly into an SQL string. This helps avoid SQL injection and also handles parameter values correctly.

MySQL: Generate Fixed-Length Numbers with Leading Zeros

There may be situations where you need to display a number from the database in a specific format.

For example, you may want to display a number from 001 to 999 instead of 1 to 999.

The following MySQL query can be used to add leading zeros to a number.

MySQL Query

SELECT LPAD(intfield_id, 3, '0') AS columnname FROM test;

For example:

intfield_idResult
1001
9009
25025
100100
999999

The LPAD() function adds characters to the left side of a string until it reaches the specified length.

In this example:

LPAD(intfield_id, 3, '0')

means that the value should have a total length of 3 characters, and 0 should be added to the left when necessary.

This can be useful when a database value needs to be displayed as a fixed-length number, such as 001, 002, 003, and so on.


MySQL: LIMIT Not Working as Expected

I have a Case Study!

I received a question about why the MySQL LIMIT clause was not working as expected. However, the behavior was correct according to the MySQL documentation.

The LIMIT clause can be used in the following format:

LIMIT offset, row_count

The first parameter specifies the starting position. The first record starts at position 0.

The second parameter specifies the number of records to return, not the position of the last record.

Example 1

LIMIT 0, 10

This returns 10 records starting from position 0, that is, positions 0 through 9.

Example 2

LIMIT 10, 20

This returns 20 records starting from position 10, that is, positions 10 through 29.

Example 3

LIMIT 10, 10

This returns 10 records starting from position 10, that is, positions 10 through 19.

For example:

SELECT *
FROM dbName.emp
LIMIT 10, 10;

The query returns 10 records, starting from the record at position 10.


MySQL: Use of the LIMIT Keyword

MySQL: Use of the LIMIT Keyword

The LIMIT keyword is used to restrict the number of rows returned by a MySQL query. There are several situations where LIMIT can help MySQL reduce unnecessary processing.

  1. LIMIT with ORDER BY

If you use LIMIT row_count with ORDER BY, MySQL can stop sorting once it has found the required number of rows instead of sorting the complete result. If the ordering can be done using an index, this can be very fast.

  1. LIMIT with DISTINCT

When LIMIT is combined with DISTINCT, MySQL stops processing once it finds the required number of unique rows.

  1. LIMIT with GROUP BY

In some cases, GROUP BY can be resolved by reading the key in order and calculating the required summaries. LIMIT can prevent MySQL from calculating unnecessary GROUP BY values.

  1. LIMIT and Query Execution

Once MySQL has sent the required number of rows to the client, it can stop processing the query unless SQL_CALC_FOUND_ROWS is being used.

  1. LIMIT 0

LIMIT 0 quickly returns an empty result set. This can be useful for checking whether a query is valid.

Example

SELECT * FROM dbName.emp LIMIT 0;

LIMIT 0 can also be useful with MySQL APIs when you need to determine the types of the result columns.

Example

SELECT * FROM dbName.emp LIMIT 10;

The above query retrieves only 10 records from the emp table.

Sometimes we need to retrieve records in batches. For example, if the emp table contains 100 records and we want to retrieve 10 records at a time, we can use LIMIT with an offset.

SELECT * FROM dbName.emp LIMIT 0, 10; SELECT * FROM dbName.emp LIMIT 10, 10; SELECT * FROM dbName.emp LIMIT 20, 10;

The first value specifies the starting position, and the second value specifies the number of records to return.

Case Study: Understanding LIMIT

I came across a question where someone felt that LIMIT was not working correctly. The issue was actually with understanding the meaning of the two parameters.The first parameter indicates the starting record. 

The first record starts at position 0. The second parameter specifies the number of records to return, not the ending record.

For example:

LIMIT 0, 10

This returns 10 records starting from position 0, which corresponds to records 0 through 9.

LIMIT 10, 20

This returns 20 records starting from position 10, which corresponds to records 10 through 29.

LIMIT 10, 10

This returns 10 records starting from position 10, which corresponds to records 10 through 19.

Example:

SELECT * FROM dbName.emp LIMIT 10, 10;

In short, remember:

LIMIT offset, row_count

The first value is the starting position, and the second value is the number of rows to return.


Sunday, September 14, 2014

Hibernate Many-to-One Relationship Example Using Annotations

As we all know Hibernate is an easy and fast framework for work with any Database using Java language. This example show how to work with Many-To-One relationship in Hibernate.


I have used MySQL as database (Download Here) and Hibernate 3 jar files (Download Here). Also for applying Many-To-One relation we have used annotation. Even you can do this by using .xml config also, but that's too old and no one is using that now-a-days.

Create table department and employee :-

 Table department :
CREATE TABLE `department` (
  `deptid` int(11) NOT NULL,
  `deptname` varchar(100) default NULL,
  PRIMARY KEY  (`deptid`)
) ENGINE=InnoDB DEFAULT CHARSET=big5;


Table employee :
CREATE TABLE `employee` (
  `empid` int(11) NOT NULL,
  `empname` varchar(50) default NULL,
  `deptno` int(11) default NULL,
  PRIMARY KEY  (`empid`),
  KEY `deptno` (`deptno`),
  CONSTRAINT `employee_ibfk_1` FOREIGN KEY (`deptno`) REFERENCES `department` (`deptid`)
) ENGINE=InnoDB DEFAULT CHARSET=big5;
In this above both table , many employee could be from one department and implements Many-to-One relationship.


hibernate.cnf.xml

<?xml version="1.0" encoding="UTF-8"?>
<!DOCTYPE hibernate-configuration PUBLIC
        "-//Hibernate/Hibernate Configuration DTD 3.0//EN"
        "http://hibernate.sourceforge.net/hibernate-configuration-3.0.dtd">
<hibernate-configuration>
   <session-factory>
        <!-- Adding mysql dialect -->
        <property name="hibernate.dialect">org.hibernate.dialect.MySQLDialect</property>
           <property name="hibernate.connection.driver_class">com.mysql.jdbc.Driver</property>
        <!-- Here jdeveloperguidedb is the database name -->
        <property name="hibernate.connection.url">jdbc:mysql://localhost:3306/jdeveloperguidedb</property>
           <property name="hibernate.connection.username">root</property>
           <property name="hibernate.connection.password">root</property>
           <!-- show_sql property will help you to show the generated hibernate query on console -->          
           <property name="show_sql" >true</property> 
           <!-- Mapping entity class to hibernate -->
           <mapping class="com.jdeveloperguide.lab.Employee"></mapping> 
           <mapping class="com.jdeveloperguide.lab.Department"></mapping> 
    </session-factory>
</hibernate-configuration>

In this hibernate.cnf.xml file we have configure the initial setup for db , and it will help us to interact with db using hibernate.

Department.java

package com.jdeveloperguide.lab;

import javax.persistence.Column;
import javax.persistence.Entity;
import javax.persistence.Id;
import javax.persistence.Table;

@Entity
@Table(name="department")
public class Department {

    @Id
    @Column(name="deptid")
    private int deptid;
   
    private String deptname;
   
    public int getDeptid() {
        return deptid;
    }
    public void setDeptid(int deptid) {
        this.deptid = deptid;
    }
    public String getDeptname() {
        return deptname;
    }
    public void setDeptname(String deptname) {
        this.deptname = deptname;
    }
}
Here Department.java is the entity class which we are going to persist or save into db.We have used few annotation here like @Entity ,@Table , @Id , @Column , etc. This entity class looks like a helper class.

@Entity - This annotation will help you to define entity in RDBMS.

@Table - This annotation will help you to define a database table (entity) by specifying name.

 i.e. @Table(name="department").

@Id - This annotation will help you to define the id column , it means the primary key.

@Column - This annotation will help you to define the column name by specifying the column name. If your column name and java variable name are different the you can specify by name. In this example our database column name and variable name are same so, not required specify the column name. Hibernate will automatically match and take care this. But I have used because for better understanding.


Employee.java

package com.jdeveloperguide.lab;

import javax.persistence.CascadeType;
import javax.persistence.Column;
import javax.persistence.Entity;
import javax.persistence.Id;
import javax.persistence.JoinColumn;
import javax.persistence.ManyToOne;
import javax.persistence.Table;

@Entity
@Table(name="employee")
public class Employee {

@Id   
@Column(name="empid")
private int empid;

@Column(name="empname")
private String empname;

@ManyToOne(cascade=CascadeType.ALL)
@JoinColumn(name="deptno")
private Department dept;

public int getEmpid() {
    return empid;
}

public void setEmpid(int empid) {
    this.empid = empid;
}

public String getEmpname() {
    return empname;
}

public void setEmpname(String empname) {
    this.empname = empname;
}

public Department getDept() {
    return dept;
}

public void setDept(Department dept) {
    this.dept = dept;
}   
}


 Here Employee.java is the entity class which we are going to persist or save into db along with Department.We have used few more new annotations here like @ManyToOne , @JoinColumn, etc.
Here we have mapped many-to-one , means many employee from one department.

@ManyToOne - Mapping many-to-one relation with hibernate.

@JoinColumn - This annotation is used for map the reference foreign key for any entity. This indicates the association with entity/table.

 CreateSessionFactory.java

package com.jdeveloperguide.lab;

import org.hibernate.SessionFactory;
import org.hibernate.cfg.AnnotationConfiguration;

public class CreateSessionFactory {
    //Single point of access for SessionFactory
    private static final SessionFactory sessionFactory;
    static {
        try {
            //create sesson factory using the config file
            sessionFactory = new AnnotationConfiguration().configure("hibernate.cnf.xml").buildSessionFactory();
        } catch (Throwable ex) {
            throw new ExceptionInInitializerError(ex);
        }
    }
   
    //Static method for exposing the session
    public static SessionFactory getSessionFactory() {
        return sessionFactory;
    }
}

This class will help to create the SessionFactory object using .xml config file. This class having static method with we can call from any part of this application for getting SessionFactory object.Because , we will create Session object from SessionFactory

MainClass.java

package com.jdeveloperguide.lab;

import org.hibernate.HibernateException;
import org.hibernate.Session;
import org.hibernate.Transaction;


public class MainClass {

    /**
     * @param args
     */
    public static void main(String[] args)throws Exception {
        MainClass mainObject=new MainClass();;
        Employee employee=new Employee();
        Department department=new Department();
        department.setDeptid(7);
        department.setDeptname("Computer Science");
       
        employee.setDept(department);
        employee.setEmpid(8);
        employee.setEmpname("Mr. JDeveloper");
        mainObject.saveEmployee(employee);
    }
   
    public void saveEmployee(Employee employee)throws Exception{
        Transaction transaction=null;
        Session session=null;
       
        try{
        //Create and open session
        session = CreateSessionFactory.getSessionFactory().openSession();
        //Create Transaction for maintain a user session
        transaction=session.beginTransaction();
        //Save the employee
        //Also it will save department ,because we have used cascade=CascadeType.ALL in employee
        session.save(employee);
        transaction.commit();
        }catch(HibernateException hibernateException){
            transaction.rollback();
            System.out.println("Error during save into DB :::"+hibernateException);
        }finally{
            session.close();
        }
    }
}

 This MainClass.java is the starting point of this example. Here we will execute our hibernate Many-to-One example and it will persist the data into DB.

Hibernate Generated SQL :-

Hibernate: select department_.deptid, department_.deptname as deptname1_ from department department_ where department_.deptid=?
Hibernate: insert into department (deptname, deptid) values (?, ?)
Hibernate: insert into employee (empname, deptno, empid) values (?, ?, ?)
When we will execute the MainClass.java class , it will generate these above queries by hibernate and these are auto generated. Its generating and showing because, we have mentioned in .xml config file show_sql is true.


Result in DB :-

Department Table


Employee Table