Showing posts with label Eclipse. Show all posts

Monday, September 7, 2026

Tomcat 7 Catalina.start LifecycleException – Failed to Start Component

Issue: Catalina.start: org.apache.catalina.LifecycleException: Failed to Start Component

This is an issue I faced with Tomcat 7 while starting the server. Usually, we start the server from the Eclipse server configuration during the development process.

The server was not able to start and was not ready to provide the service. It was trying to run for a few seconds but failed with a Windows alert.

 Console logs :-   


Nov 29, 2014 7:16:46 PM org.apache.catalina.startup.Catalina start
SEVERE: Catalina.start:
org.apache.catalina.LifecycleException: Failed to start component [StandardServer[8005]]
at org.apache.catalina.util.LifecycleBase.start(LifecycleBase.java:154)
at org.apache.catalina.startup.Catalina.start(Catalina.java:675)
at sun.reflect.NativeMethodAccessorImpl.invoke0(Native Method)
at sun.reflect.NativeMethodAccessorImpl.invoke(Unknown Source)
at sun.reflect.DelegatingMethodAccessorImpl.invoke(Unknown Source)
at java.lang.reflect.Method.invoke(Unknown Source)
at org.apache.catalina.startup.Bootstrap.start(Bootstrap.java:322)
at org.apache.catalina.startup.Bootstrap.main(Bootstrap.java:450)
Caused by: org.apache.catalina.LifecycleException: Failed to start component [StandardService[Catalina]]
at org.apache.catalina.util.LifecycleBase.start(LifecycleBase.java:154)
at org.apache.catalina.core.StandardServer.startInternal(StandardServer.java:732)
at org.apache.catalina.util.LifecycleBase.start(LifecycleBase.java:150)
... 7 more
Caused by: org.apache.catalina.LifecycleException: Failed to start component [StandardEngine[Catalina]]
at org.apache.catalina.util.LifecycleBase.start(LifecycleBase.java:154)
at org.apache.catalina.core.StandardService.startInternal(StandardService.java:443)
at org.apache.catalina.util.LifecycleBase.start(LifecycleBase.java:150)
... 9 more
Caused by: org.apache.catalina.LifecycleException: A child container failed during start
at org.apache.catalina.core.ContainerBase.startInternal(ContainerBase.java:1136)
at org.apache.catalina.core.StandardEngine.startInternal(StandardEngine.java:302)
at org.apache.catalina.util.LifecycleBase.start(LifecycleBase.java:150)
... 11 more

Caused By - There may be many reason , but I found mismatching of JRE versions. This is likely a JVM class loader issue. If you have multiple JAR files in the same directory with the same class in them , there is no defined order in which the JAR files will be searched. My installed JVM was version JDK 6 but my tomcat configuration was JDK 7.Check your server runtime configuration on Eclipse for JDK version. 
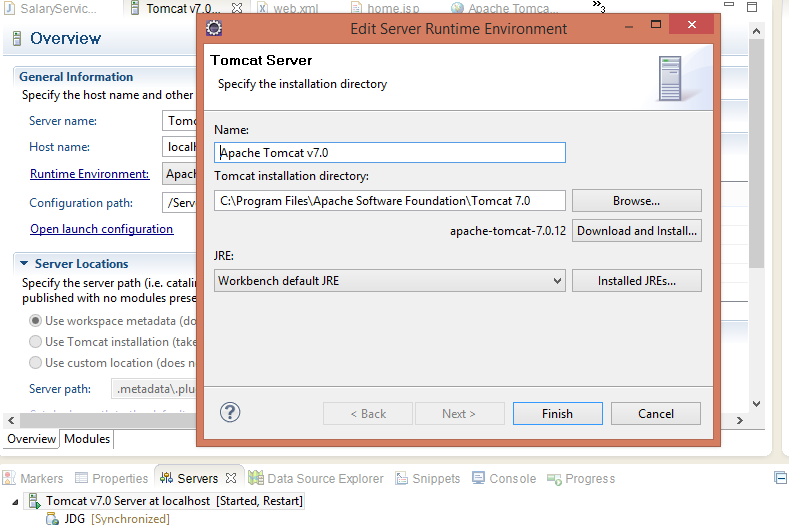


Also I did the cleanup for the server setting in Eclipse.For cleanup , right click on server configuration and click on clean.Now it works for me.


Sunday, September 6, 2026

Detecting the Current Branch Failed: Fatal: HEAD Is Not a Symbolic Ref

This issue occurs when I tried with Jenkins build using Maven Release Plugin. I was trying to build my production release artifacts. I was building my "master" branch and its for final release. I have used Git as repository. I faced this issue when clicked on "maven release build" link on left side corner of my Maven project (Jenkins job) .

As we know build issue is common for developers those are actively participating with Build and Release. This issue over Jenkins is common , but I never found any direct or easy solution for this. I spend couple of hour to resolve and google almost all relevant sites and article.But, not able to work out. Finally did it by some HIT and TRY ,then it works for me.   


Issue log details :-

[INFO] ------------------------------------------------------------------------
[INFO] BUILD FAILURE
[INFO] ------------------------------------------------------------------------
[INFO] Total time: 23.884s
[INFO] Finished at: Wed Dec 17 18:05:43 EST 2014
[INFO] Final Memory: 15M/301M
[INFO] ------------------------------------------------------------------------
Waiting for Jenkins to finish collecting data
[ERROR] Failed to execute goal org.apache.maven.plugins:maven-release-plugin:2.0:prepare (default-cli) on project hello_world_app: An error is occurred in the checkin process: Exception while executing SCM command. Detecting the current branch failed: fatal: ref HEAD is not a symbolic ref -> [Help 1]
[ERROR]
[ERROR] To see the full stack trace of the errors, re-run Maven with the -e switch.
[ERROR] Re-run Maven using the -X switch to enable full debug logging.
[ERROR]
[ERROR] For more information about the errors and possible solutions, please read the following articles:
[ERROR] [Help 1] http://cwiki.apache.org/confluence/display/MAVEN/MojoExecutionException
[JENKINS] Archiving /opt/jenkins_dev/workspace/SDP_BIZ_HELLO_WORLD_APP/pom.xml to in.com.company.xcop.sdp.bizservice.test.dao/hello_world_app/0.0.8-SNAPSHOT/ hello_world_app -0.0.8-SNAPSHOT.pom
channel stopped
Started calculate disk usage of build
Finished Calculation of disk usage of build in 0 seconds
Started calculate disk usage of workspace
Finished Calculation of disk usage of workspace in 0 seconds

Solution :-

 In Jenkins job , open the configuration and go to Git configuration => Advance Options => << add your local branch name >>. In my case I have added "master" .

If you are using some other version of jerkins then , you may find the similar settings with other way. In the same way Git configuration => Advance Options => Additional Behaviors => Check out to specific local branch => << Add your local branch name >>.   

Attached the screenshot below with highlight. 


Friday, September 4, 2026

Java: Fixing JVM Heap Size Errors in Eclipse and MyEclipse

I have used this setting in my IDE. I got this type of error when my team was working on a social-network-type project using the Struts framework. I was really in trouble and was looking for a solution. Finally, I found the solution, and it helped me. I hope it helps you too.

Follow these simple steps to change the Heap Size of Tomcat in Eclipse.

  1. Open the Servers tab in Eclipse and double-click the Tomcat server to open the Server Configuration.


2. In Server Configuration, click on the Launch Configuration link under General Information.
3. Under Arguments tab, add following values in VM arguments.
1
-Xms64m -Xmx256m

Thursday, March 15, 2018

How to Create Your First Spring Boot Application

Developing your first Spring Boot application is quite easy. As we know Spring Boot makes it easy to create stand-alone, production-grade Spring based Applications that you can "just run". Its basically to minimize the configuration. 

In this example I have used below frameworks and tools for this example.

1. Maven 3.3.9 
2. JDK 1.8
3. Eclipse IDE
4. spring-boot dependency 


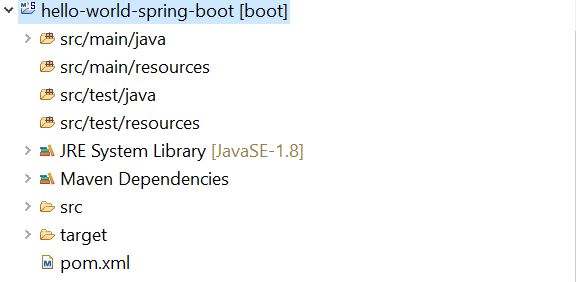
First step - In eclipse create a maven project  "hello-world-spring-boot" as below .


Then add the dependency for spring-boot and plug-in in the pom.xml file.


Pom.xml

<project xmlns="http://maven.apache.org/POM/4.0.0" xmlns:xsi="http://www.w3.org/2001/XMLSchema-instance"
xsi:schemaLocation="http://maven.apache.org/POM/4.0.0 http://maven.apache.org/xsd/maven-4.0.0.xsd">
<modelVersion>4.0.0</modelVersion>
<groupId>com.javadevelopersguide.www</groupId>
<artifactId>hello-world-spring-boot</artifactId>
<version>0.0.1-SNAPSHOT</version>
<description>This is a hello world example with Spring Boot.</description>
<parent>
<groupId>org.springframework.boot</groupId>
<artifactId>spring-boot-starter-parent</artifactId>
<version>1.5.10.RELEASE</version>
</parent>
<dependencies>
<dependency> <groupId>org.springframework.boot</groupId> <artifactId>spring-boot-starter-web</artifactId> </dependency> </dependencies>
<properties>
<java.version>1.8</java.version>
</properties>
<build>
<plugins>
<plugin>
<groupId>org.springframework.boot</groupId>
<artifactId>spring-boot-maven-plugin</artifactId>
</plugin>

</plugins>
</build>
</project>
Then create a controller class "HelloWorldController" with a rest api method sayHello()

HelloWorldController.java
package com.techbyteslearn.springboot.example;
import org.springframework.boot.autoconfigure.EnableAutoConfiguration;
import org.springframework.stereotype.Controller;
import org.springframework.web.bind.annotation.RequestMapping;
import org.springframework.web.bind.annotation.ResponseBody;

@Controller
@EnableAutoConfiguration
public class HelloWorldController {
@RequestMapping("/hello")
@ResponseBody
public String sayHello() {
return "Hello World Developer!!!";
}
}
I have use below annotations in my controller. Here in this example the uri path is /hello

@Controller - This is used to specify the controller , as its spring framework basic.
@EnableAutoConfiguration - This enable auto configuration for Application Context. 
@RequestMapping - This is used to map to spring mvc controller method.
@ResponseBody - Used to bind http response body with a domain object in return type.Its behind the scenes. 

Now , my controller is ready.Just I need a luncher , who can lunch my spring boot application. I have created a "SpringBootApplicationLuncher".

SpringBootApplicationLuncher.java


package com.techbyteslearn.springboot.example;
import org.springframework.boot.SpringApplication;

public class SpringBootApplicationLuncher {
public static void main(String[] args) {
SpringApplication.run(HelloWorldController.class, args);
}
}

Now you can run this launcher to start the spring boot application.Then, you can see the below screenshot showing the tomcat is started. As you know spring-boot is embedded with tomcat feature.


Now , your application is up and running . I have highlighted above that the tomcat is started on default port 8080

Try this tomcat URL, which is running now :- http://localhost:8080/hello


Alternatively , Also you can also start your spring-boot application on command line (Terminal). I have used windows OS.

You can use the below Maven Command  to build and run this spring-boot application :- 


1. Build the application :- mvn clean install


2. Run the application :- mvn spring-boot:run


 Now the service is running on tomcat port 8080 .Use the below URL to access the sayHello() api.

http://localhost:8080/hello

Monday, February 12, 2018

How to Add Copyright Header to Java Files in Eclipse

How to add @copyright to your code in eclipse ?

As a developer , we mostly want to reduce few development or coding effort while working on a project. Adding @copyright to your java file or your project file is quite easy. There are few ways you can achieve these. 

First Solution :- You can use 3rd party plugin to generate the @copyright. Follow the steps to install the plugin and add copyright for your project.

 1. Go to => Help => Eclipse MarketPlace => Search for copyright generator


2. Click on => Install and proceed further for finishing the installation. After the plugin installed successfully.
3. Go to menu => Project => Apply Copyright 


4. Now , Select custom copyright and paste your copyright header text in the text area. I have used the below sample header for my blogging.


/*******************************************************************************
 * TechBytes - Confidential
 * ____________________
 *
 * [2018] - [2019]  TechBytes Incorporated
 * All Rights Reserved.
 * 
 * NOTICE:  All information contained herein is, and remains
 * the property of  TechBytes Incorporated and its suppliers,
 * if any.  The intellectual and technical concepts contained
 * herein are proprietary to  Java Developers Guide Incorporated
 * and its posts and articles are protected by trade secret or copyright law.
 * Dissemination of this information or reproduction of this material
 * is strictly forbidden unless prior written permission is obtained
 * from TechBytes Blogging.
 *
 * Generated on Feb 12, 2018
 ******************************************************************************/

Then , apply the included or excluded as per your need. I have added the included in this example. That means here I want to add copyright header text for all java file (i.e. *.java).  This expression will to add all .java files. Sample image below.


 5. Next => select the project you want to apply => Then select the java files you want to apply 


6. Now you can see the java files with your header copyright text as below.


Second Solution :-


You can directly add the header copyright text into the {template} in eclipse IDE. Follow the steps below.

1. Go to => Windows => Preferences => Java => Code Style = > Code Templates => Code

Then select "New Java files" , then add your copyrights in the first line as mentioned in the image below. Then Apply and finish.


2. Now create a new file ( Go to = File => New => Java Class)


Now you can see the copyrights has been added to your java classes. Hope it will help you to improve the coding practice and coding standards.


Hope it will help you.