Showing posts with label Windows. Show all posts

Monday, September 7, 2026

MySQL: Schedule Automatic Database Backup on Windows

Quite simple. Since you have already read my older post about creating a backup (dump) file, here we will see how to automatically take a backup of a MySQL database at a particular time on your local Windows system.

This can be done using a batch file and Windows Task Scheduler.

Steps to create a scheduled backup:

Step 1: Create a batch file with the mysqldump command and the required options, as mentioned in the old post.

Step 2: Open Windows Task Scheduler.

You can search for Task Scheduler from the Windows Start menu.

Step 3: Create a new task or basic task and configure it to run the batch file at the required date and time.

After completing the configuration, wait for the scheduled time and check the destination directory. If everything is configured correctly, the MySQL backup file should be created automatically.

Friday, September 4, 2026

MySQL: Create Database Backup Using a Windows Batch File

Creating a complete solution in MySQL can sometimes be challenging, especially when you are looking for a specific administration or backup requirement.

I faced this situation several times while working with my development team. One of my colleagues asked me how to create MySQL database dumps using a batch file so that the backup could be executed easily from Windows.

I had already written about creating MySQL dumps using the command line, but this time I needed to automate the process using a Windows batch file.

After preparing the batch file and testing it successfully, I thought it would be useful to share the approach here.

Create the Batch File

Create a new file with a .bat extension, for example:

mysql_backup.bat

Add the following commands to the file:

cd "C:\Program Files\MySQL\MySQL Server\bin" mysqldump -hlocalhost -uroot -p testDB1 > D:\mybackupdumps.sql exit

Replace the following values according to your environment:

  • localhost — MySQL server host
  • root — MySQL username
  • testDB1 — database name
  • D:\mybackupdumps.sql — location and name of the backup file

When the batch file runs, mysqldump will prompt for the MySQL password.


Note: Avoid putting the MySQL password directly in the batch file because the file may be accessible to other users or applications.

Backup a Database on a Remote Server

You can also specify the MySQL server hostname or IP address using the -h option:

cd "C:\Program Files\MySQL\MySQL Server\bin" mysqldump -h192.168.1.100 -umyuser -p mydatabase > D:\mybackup.sql exit

Replace the host, username, database name, and output path with your actual values.

Backup All Databases

If you want to create a dump containing all databases accessible to the MySQL user, use the --all-databases option:

cd "C:\Program Files\MySQL\MySQL Server\bin" mysqldump -hlocalhost -umyuser -p --all-databases > D:\myalldatabases.sql exit

Useful mysqldump Options

mysqldump provides many options that can be used to control how the dump is created. Some commonly used options include:

--add-locks
Adds LOCK TABLES and UNLOCK TABLES statements around table dumps.

--all-databases
Dumps all databases.

--comments
Includes comments in the dump file.

--compact
Produces a more compact dump output by reducing some additional statements and comments.

--ignore-table=db_name.table_name
Excludes the specified table from the dump.


Final Note

A Windows batch file makes it easier to repeat a database backup command without manually typing it each time. It can also be used as part of a scheduled backup process using Windows Task Scheduler.

The exact MySQL installation path may differ depending on the MySQL version and how it was installed, so update the cd path accordingly.


Thursday, September 3, 2026

Windows 10: Fix 99% Disk Usage Problem

Windows 10 Disk Usage Shows 99%
 
Are you facing the same issue with Windows 10, where the disk usage shows 99% even when you are not doing much on the computer? 
 
This can make an old laptop or desktop extremely slow and difficult to work with.
 
One thing you can check is Task Manager, where you may notice that the disk usage is constantly close to 100%.
  
Follow the below steps
  • Search for Services in Windows, or open the Run command and type:
  •    `services.msc`
  •  Find SysMain (previously known as Superfetch).
  • Right-click SysMain and select Properties.
  • Click Stop to stop the service.
  • Change the Startup type to Disabled if you want to prevent it from starting automatically.
  •  Next, find Windows Search.
  • Right-click Windows Search and select Properties.
  • Click Stop and change the Startup type to Disabled.

After making these changes, check Task Manager again to see whether the disk usage has reduced.

This worked for me when I experienced high disk usage on an older Windows 10 system.
 

Saturday, February 18, 2017

Recover Missing or Unallocated Space on a USB Drive Using DiskPart

Recover Missing Or Un-allocated Space On A USB Drive - using disk-part


Are you worried about your USB Drive? You are thinking you have lost your USB. But, this is quite obvious when you have done something with your USB drive. What happened to your USB Drive ?

Normally when you are playing with file systems , you should bit aware about the pros and cons. However, you no need to worry . You can recover your USB Drive memory space once again.

Every Operating System(OS) has different file systems. When you use your USB Drive cross platform purpose, It mean you are playing with different file systems. What happened to your USB Drive ? Why its not allowing/showing you to the original space/capacity ? 


Let's Assume..... with few below points.

1. May be you have deleted the partition. It means Un-allocated space.
2. May be you have burned your space with some different file system , which is not supported by your current OS file system.
3. May be some other reason.


Here, In this post I have lost my memory space . I have burned my USB Drive space, because I was creating bootable Linux Installation drive.I will post in my next article
how to create a bootable USB drive. I have used the below USB Drive for this Post.

USB Drive Details:-

San Disk , 16 GB Capacity

You need to just check with Windows Disk Management. You will find all information about your computer/desktop drive. Below disk management image shows the disk status.
This will show you the disk allocation , disk space usage, and some other helpful information.
 
java developers guide - disk managment tool
Disk Management - Windows


As I mentioned above, I have lost my pendrive. Its not useful for me until I recover the memory. I am using here Windows 10 OS to recover my lost space.

Windows OS is providing feature to manage your disk partitions using diskpart command.

Open command line or run command and type diskpart.

java developers guide- diskpart
diskpart - open by run command


Now, just simply follow the below commands one-by-one.

1. Check the list of disks in your computer.

          list disk

2. Select your disk that you want to recover. You need to be very careful here , because if you choose the wrong disk you might loose some other data. So, here I am choosing disk 1. Because, its a common sense  my USB Drive capacity is 16 GB.

       select disk 1

3. Now , do clean for your chosen disk.

       clean

4. Now, you have already got successfully cleaning the disk message. Now you need to create a partition for your disk . This is the primary partition, though you are creating only one drive.

     create partition primary

5. If you got succeeded, then you are done. Just exit.

    exit


Below Image will help you to get the commands easily. 


java_developers_guide_diskpart console
diskpart console


Your USB Drive is not yet ready to use. You have just recovered your space, but you need to format the USB Drive. Being I am using Windows 10 , I need to format this USB Drive
to Windows compatible. Windows OS compatible file systems are NFTS,FAT/FAT16/FAT32. Below image will show you ....


java developers guide - formatting
Formatting - recovered

Hope you are happy now :) You got your USB Drive back.. and same some Dollars :)

Saturday, June 20, 2015

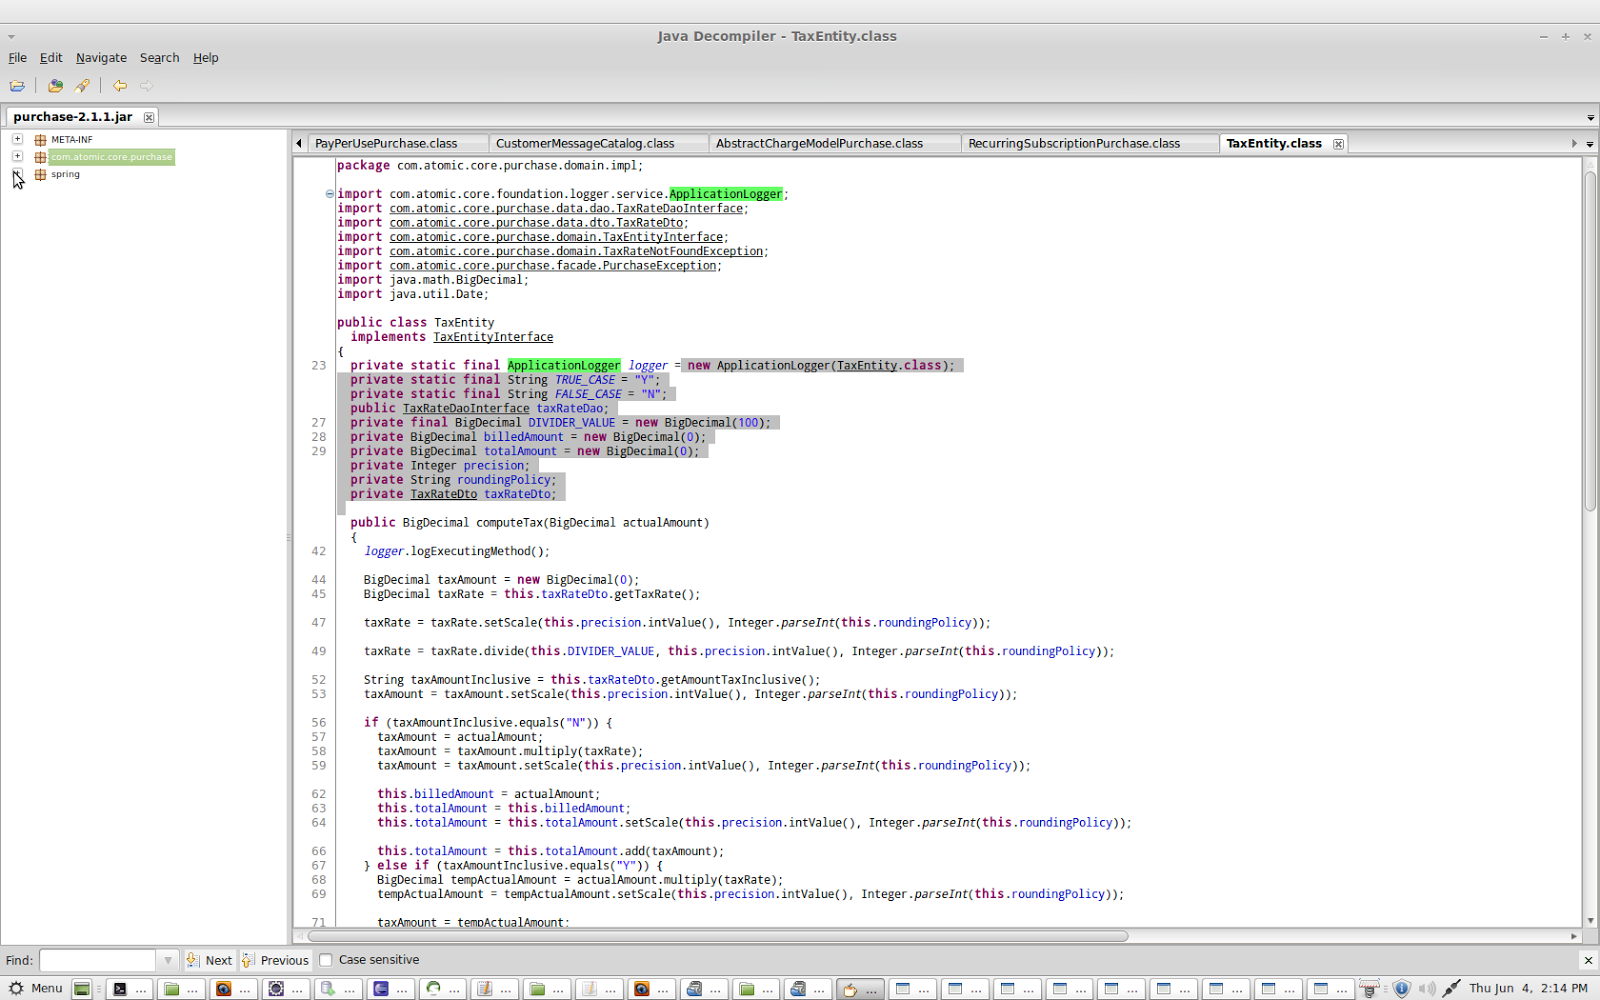
How to Decompile Java Class Files on Linux and Windows

How to install graphical java de-compiler (jd-gui) ?

Really this is very basic and very useful when you want to de compile the existing old legacy code . I faced this kind of situation many times and did the same thing. I am sharing this because it may help you .

I am using Linux (Ubuntu Maya). But, you can try with any other Linux distributions even windows OS also. You need to download the 

Download from here.


You  need to download the.tar.gz file  ( jd-gui-0.3.5.linux.i686.tar.gz) for Linux. Then extract the file and go to jd-gui-0.3.5.linux.i686 folder. You can extact via below command else you can try by right+click on the file and extract.

tar -xvf jd-gui-0.3.5.linux.i686.tar.gz

Check there are such below files in that directory.

 
dev@jdg-developer-desktop ~/Downloads/jd-gui-0.3.5.linux.i686 $ ls -ltr
total 1100
drwx------ 3 dev dev    4096 Aug 29  2012 contrib
-rwxrwxr-x 1 dev dev 1111160 Oct 16  2012 jd-gui
-rw-r--r-- 1 dev dev    2462 Oct 16  2012 readme.txt
-rw-r--r-- 1 dev dev     317 Jun  4 14:15 jd-gui.cfg
dev@jdg-developer-desktop ~/Downloads/jd-gui-0.3.5.linux.i686 $ 

Execute the jd-gui and open the application :
dev@jdg-developer-desktop ~/Downloads/jd-gui-0.3.5.linux.i686 $ ./jd-gui  


You can import multiple jar files for de-compile and see the code.

Note - You may get some kind of library missing error , but it depends on you operating system.Whether you are using Fedora,Mint ,Cent Os or Ubuntu. So, you need to install the respective lib and need to update the OS terminal if required.You need to install the below extra libraries if its asking.

 sudo apt-get install libgtk2.0-0:i386 libxxf86vm1:i386 libsm6:i386 lib32stdc++6
I have fixed in my desktop, because of this missing lib I was getting some kind of library missing error. But you can fix this and TRY........Good Luck.

Thursday, September 11, 2014

Java Command Not Working from Command Prompt in Windows

This issue I faced with window 8. When I was trying to execute java command from command prompt it was showing this error.After long time analysis I found the reason for this issue. This issue is really ambiguous.Its normally a path issue, if your class path has configured proper and still its not working then it might be a big reason to worry.

Solutions 1 :- Check your class path , if not set then use the below command to set.

path = your_java_installation_bin_path; 

Solutions 2 :- Probably there is few more java.exe file in your windows directory (i.e. C:\) .Normally when windows automatic updates works on your machine it may be install java into some other reference directory and it may be the cause.So, when you are trying to execute the java command from command prompt its not able to locate the exact path . 
 
As a solution , I have done this by removing all the java.exe files from windows directory.

You can search the java.exe file from windows directory and remove all java application files , except your own java installation directory. After removing all those extra java application files its working fine for me. Below the screen shot for finding and removing the java application file.