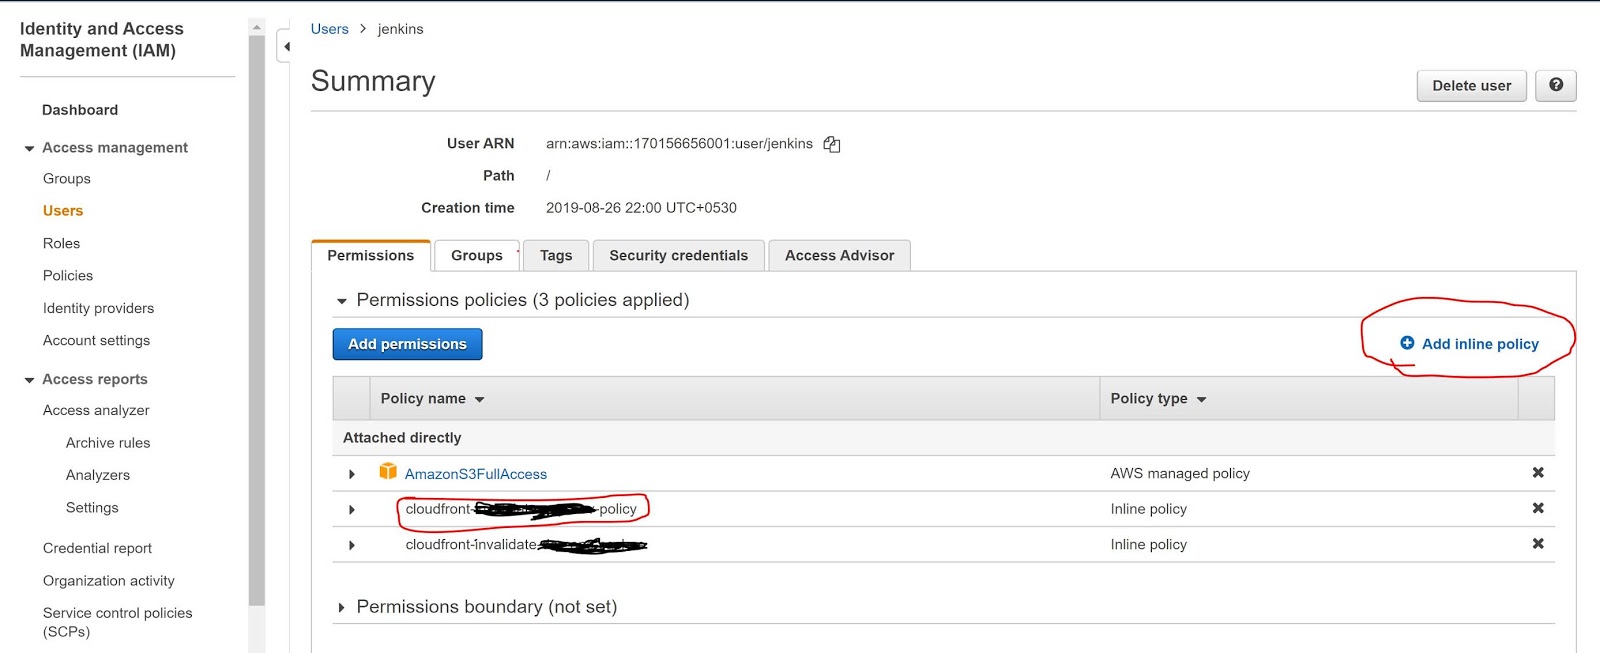
If you are getting Access Denied when calling the CreateInvalidation operation from AWS CLI, it must be a permission issue for that user.
In this post, I am using the Jenkins pipeline to build and push the artifacts into S3. I am using CloudFront as the Content Delivery Network (CDN) and hosting my website in Route 53.
When I am trying to invalidate the CloudFront Distribution cache from the CLI, I am getting the error below. I thought adding a screenshot would provide more visibility, so I have added it below.
Error Log:
A client error (AccessDenied) occurred when calling the CreateInvalidation operation: User: arn:aws:iam::xxxxxxxxxxx:user/yyyy is not authorized to perform: cloudfront:
The AWS CLI commands I am using are:
aws configure set preview.cloudfront true
aws cloudfront create-invalidation --distribution-id UJH89JKKMOVY340 --paths "/*"
Resolution:
Add the CreateInvalidation permission to that user. Below are the steps to add the permission.
Go to Identity and Access Management (IAM).
Go to Users and find your username. In my case, it is Jenkins.
Then add a new Inline policy, as shown in the screenshot below.
- Now add the below policy into the JSON policy editor. Below the screenshot.
Policy JSON:-
{
"Version": "2012-10-17",
"Statement": [
{
"Sid": "VisualEditoro",
"Effect": "Allow",
"Action": "cloudfront:CreateInvalidation",
"Resource": "arn:aws:cloudfront::17088938460999:distribution/UJH89JKKMOVY340"
}
]
}
Sample Screenshot:-
Now, it's working fine. I can see the Jenkins logs below.
Jenkins Success Log:-
; perhaps you meant to use ‘PATH+EXTRA=/something/bin’?
+ aws configure set preview.cloudfront true
[Pipeline] sh
Warning: JENKINS-41339 probably bogus PATH=/var/lib/jenkins/tools/jenkins.plugins.nodejs.tools.NodeJSInstallation/node-v10.16.3-linux-x64/bin:/var/lib/jenkins/tools/hudson.model.JDK/JDK8-152/bin:$PATH:/usr/local/bin:$MAVEN_HOME/bin:/usr/local/bin:/var/lib/jenkins/tools/hudson.tasks.Maven_MavenInstallation/mvn/bin:/usr/sbin:/usr/bin:/sbin:/bin; perhaps you meant to use ‘PATH+EXTRA=/something/bin’?
+ aws cloudfront create-invalidation --distribution-id UJH89JKKMOVY340 --paths '/*'
{
"Invalidation": {
"Status": "InProgress",
"InvalidationBatch": {
"Paths": {
"Items": [
"/*"
],
"Quantity": 1
},
"CallerReference": "cli-1588239578-85708"
},
"Id": "I3HILN71CKWOV4",
"CreateTime": "2020-04-30T09:39:38.919Z"
},
"Location": "https://cloudfront.amazonaws.com/2019-03-26/distribution/UJH89JKKMOVY340/invalidation/I3HILN71CKWOV4"
}
Hope this will help you.