Thursday, March 15, 2018

How to Create Your First Spring Boot Application

Developing your first Spring Boot application is quite easy. As we know Spring Boot makes it easy to create stand-alone, production-grade Spring based Applications that you can "just run". Its basically to minimize the configuration. 

In this example I have used below frameworks and tools for this example.

1. Maven 3.3.9 
2. JDK 1.8
3. Eclipse IDE
4. spring-boot dependency 


First step - In eclipse create a maven project  "hello-world-spring-boot" as below .
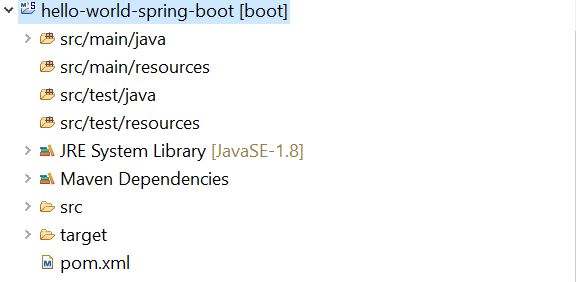

Then add the dependency for spring-boot and plug-in in the pom.xml file.


Pom.xml

<project xmlns="http://maven.apache.org/POM/4.0.0" xmlns:xsi="http://www.w3.org/2001/XMLSchema-instance"
xsi:schemaLocation="http://maven.apache.org/POM/4.0.0 http://maven.apache.org/xsd/maven-4.0.0.xsd">
<modelVersion>4.0.0</modelVersion>
<groupId>com.javadevelopersguide.www</groupId>
<artifactId>hello-world-spring-boot</artifactId>
<version>0.0.1-SNAPSHOT</version>
<description>This is a hello world example with Spring Boot.</description>
<parent>
<groupId>org.springframework.boot</groupId>
<artifactId>spring-boot-starter-parent</artifactId>
<version>1.5.10.RELEASE</version>
</parent>
<dependencies>
<dependency> <groupId>org.springframework.boot</groupId> <artifactId>spring-boot-starter-web</artifactId> </dependency> </dependencies>
<properties>
<java.version>1.8</java.version>
</properties>
<build>
<plugins>
<plugin>
<groupId>org.springframework.boot</groupId>
<artifactId>spring-boot-maven-plugin</artifactId>
</plugin>

</plugins>
</build>
</project>
Then create a controller class "HelloWorldController" with a rest api method sayHello()

HelloWorldController.java
package com.techbyteslearn.springboot.example;
import org.springframework.boot.autoconfigure.EnableAutoConfiguration;
import org.springframework.stereotype.Controller;
import org.springframework.web.bind.annotation.RequestMapping;
import org.springframework.web.bind.annotation.ResponseBody;

@Controller
@EnableAutoConfiguration
public class HelloWorldController {
@RequestMapping("/hello")
@ResponseBody
public String sayHello() {
return "Hello World Developer!!!";
}
}
I have use below annotations in my controller. Here in this example the uri path is /hello

@Controller - This is used to specify the controller , as its spring framework basic.
@EnableAutoConfiguration - This enable auto configuration for Application Context. 
@RequestMapping - This is used to map to spring mvc controller method.
@ResponseBody - Used to bind http response body with a domain object in return type.Its behind the scenes. 

Now , my controller is ready.Just I need a luncher , who can lunch my spring boot application. I have created a "SpringBootApplicationLuncher".

SpringBootApplicationLuncher.java


package com.techbyteslearn.springboot.example;
import org.springframework.boot.SpringApplication;

public class SpringBootApplicationLuncher {
public static void main(String[] args) {
SpringApplication.run(HelloWorldController.class, args);
}
}

Now you can run this launcher to start the spring boot application.Then, you can see the below screenshot showing the tomcat is started. As you know spring-boot is embedded with tomcat feature.


Now , your application is up and running . I have highlighted above that the tomcat is started on default port 8080

Try this tomcat URL, which is running now :- http://localhost:8080/hello


Alternatively , Also you can also start your spring-boot application on command line (Terminal). I have used windows OS.

You can use the below Maven Command  to build and run this spring-boot application :- 


1. Build the application :- mvn clean install


2. Run the application :- mvn spring-boot:run


 Now the service is running on tomcat port 8080 .Use the below URL to access the sayHello() api.

http://localhost:8080/hello

Sunday, March 11, 2018

How to Edit or Fix the Last Git Commit Message

How can I edit / fix the last git commits message?

Amending any message to your git or bit-bucket is quite easy. Normally sometime, a developer need to modify the last committed message in git/bit-bucket. Git command is providing easy commands to achieve this. Follow the below steps with attached screen shot and you can do this.

Just pull your working branch , where  you want to modify the last commit. But, make sure you want to modify your last commit for the working branch.I have bit-bucket in this example post.

Command Syntax:-


git commit --amend -m "Your Amend Message"
Then use the below command to push your changes.
git push -f  origin master

Example , as per the attached screenshot. I have used the command prompt for this example. In the below example , I have updated the new message "Amending new message". Then, push  (used -means --force) the message to git/bit-bucket. Use the below screenshot as reference. 


bit-bucket command - Java Developers Guide
Bit-Bucket amend


Now, you can see in bit-bucket the last committed message. The last message I have modified , its reflecting.


bit bucket amend
Bit-Bucket web view


Hope it will help you.

Monday, February 26, 2018

Wells Fargo Java interview questions for 4-8 years experience

Java/J2ee interview questions asked by Wells Fargo for 4-8 years of experience. These interview questions had asked in the 1st round of technical interview.


1. About your current project.
2. What is Abstract class and interface, when we need to use them.
3. What is the significance of concurrency API ? What are the API you have used ?
4. What is difference between Hashmap and Hashset.
5. What is use of Linked list over ArrayList
6. What is Concurrent Hashmap? Give me the internal implementation of Concurrent HashMap.
7. Can we declare final inside abstract class and interface both.
8. Tell some critical situation in your current project or solution,you have handled. 
9. Give a design level understanding on abstract class and interface implementation.While design, you need consider the system scalability, robustness , few software designing principle.

10. Write a utility using some design pattern ?
11. Write your own hibernate DAO and IMPL for persist and update the record.
12. Which Jar we need for spring annotation.
13. What is importance of @RestControllor ?
14. What is the underlined design pattern implemented in hibernate ?


Monday, February 12, 2018

How to Add Copyright Header to Java Files in Eclipse

How to add @copyright to your code in eclipse ?

As a developer , we mostly want to reduce few development or coding effort while working on a project. Adding @copyright to your java file or your project file is quite easy. There are few ways you can achieve these. 

First Solution :- You can use 3rd party plugin to generate the @copyright. Follow the steps to install the plugin and add copyright for your project.

 1. Go to => Help => Eclipse MarketPlace => Search for copyright generator


2. Click on => Install and proceed further for finishing the installation. After the plugin installed successfully.
3. Go to menu => Project => Apply Copyright 


4. Now , Select custom copyright and paste your copyright header text in the text area. I have used the below sample header for my blogging.


/*******************************************************************************
 * TechBytes - Confidential
 * ____________________
 *
 * [2018] - [2019]  TechBytes Incorporated
 * All Rights Reserved.
 * 
 * NOTICE:  All information contained herein is, and remains
 * the property of  TechBytes Incorporated and its suppliers,
 * if any.  The intellectual and technical concepts contained
 * herein are proprietary to  Java Developers Guide Incorporated
 * and its posts and articles are protected by trade secret or copyright law.
 * Dissemination of this information or reproduction of this material
 * is strictly forbidden unless prior written permission is obtained
 * from TechBytes Blogging.
 *
 * Generated on Feb 12, 2018
 ******************************************************************************/

Then , apply the included or excluded as per your need. I have added the included in this example. That means here I want to add copyright header text for all java file (i.e. *.java).  This expression will to add all .java files. Sample image below.


 5. Next => select the project you want to apply => Then select the java files you want to apply 


6. Now you can see the java files with your header copyright text as below.


Second Solution :-


You can directly add the header copyright text into the {template} in eclipse IDE. Follow the steps below.

1. Go to => Windows => Preferences => Java => Code Style = > Code Templates => Code

Then select "New Java files" , then add your copyrights in the first line as mentioned in the image below. Then Apply and finish.


2. Now create a new file ( Go to = File => New => Java Class)


Now you can see the copyrights has been added to your java classes. Hope it will help you to improve the coding practice and coding standards.


Hope it will help you.

Monday, January 29, 2018

How to Add a Custom Code Formatter to Eclipse

How to add my own or your company specified code formatter into eclipse ? 


Everyday we are facing lots of issues with development environment and its quite genuine. I though to share this steps also to help you to format your code with best practice. Usually, we need to develop a clean, and most readable code. You can add your own formatter into eclipse IDE (I am using Eclipse Mars in my example). But, You can use any other eclipse release version.

Normally we use the formatter with .xml file format. Its, nothing but a set of rules defined in XML. It defines how your code should look like as a structure.

1. Go to ==> Windows ==> Preference 

The below screen will appear.


2. Select ==> Java ==> Code Style ==> Formatter

The below screen will appear.


3. Now click on ==> Import button to import your formatter xml .

 The below screen will appear.


Now you can see the active formatter in eclipse, please see the below image with highlighted area.


The above image shows your selected formatter, now you are ready to do the code formatting as per your defined rule in the formatter xml , that you have just now imported. Now, you can  see the active profile as your formatter. You can use your keyboard shortcut key (Ctrl+Shift+F) for format the code or you can use the code format option from menu options.

In my next post I will post how to define the rules for write your own formatter. So, please keep following me.


Hope it will help you.


Thursday, October 12, 2017

Write Your First Java Program

This is very basic startup for your learning java programming language. Before writing and executing this you should make sure that you have installed the expecting JDK. This JDK is mandatory, apart from this JDK you need some IDE (i.e. Eclipse,Netbean, Jboss developer studio etc). These IDE are not mandatory ,but now-a-days these are very common to make your development easy. 

You can run the below java program on command line also  by using any text editor (i.e. notepad,text pad etc). I have used here Eclipse IDE (Oxygen) for development.

Below is the example :-

package com.techbyteslearn;
/**
 *
 * @author techbyteslearn
 *
 */
public class FristJavaProgram {
public static void main(String[] args) {
System.out.println("Welcome To Java");
}
}


OutPut :-
First Java Project

Reverse a String in Java Using Java API

Reverse a string using java existing API is really very easy. Below example will show you how to reverse the string using StringBuilder class.
package com.techbyteslearn.www;

public class ReverseString {

    /**
     * @param args
     */
    public static void main(String[] args) {

        String inputString = "javadevelopersguide";

        System.out.println("Before Reverse:: " + inputString);

        // You can do this using StringBuffer also, based on your requirement.
        // If you are concerned about thread safety, use StringBuffer.
        StringBuilder builder = new StringBuilder(inputString).reverse();

        // After reverse using StringBuilder
        inputString = builder.toString();

        System.out.println("After Reverse:: " + inputString);
    }
}
Output :-

Before Reverse::javadevelopersguide
After Reverse:: ediugsrepolevedavaj