Monday, June 17, 2019

Spring Boot JAR Error: No Main Manifest Attribute

The error "no main manifest attribute, in sample-hello-microservice-springboot.jar" occurred while trying to execute the JAR file.

This was an unusual issue with JAR file execution. In this case, I was trying to run the Docker image. The reason for this issue was that, during JAR execution, it was not able to locate the main class.

Below is the main class, HelloApplication, and the pom.xml file. It seems that the Spring Boot Maven plugin was missing, along with the configuration for the manifest (mainClass).

HelloApplication.java

package com.techbyteslearn.lab.springboot.application;

import org.springframework.boot.SpringApplication;
import org.springframework.boot.autoconfigure.SpringBootApplication;

@SpringBootApplication
public class HelloApplication {

    public static void main(String[] args) {
        SpringApplication.run(HelloApplication.class, args);
    }
}

pom.xml

<project xmlns="http://maven.apache.org/POM/4.0.0" xmlns:xsi="http://www.w3.org/2001/XMLSchema-instance" xsi:schemaLocation="http://maven.apache.org/POM/4.0.0 http://maven.apache.org/xsd/maven-4.0.0.xsd"> <modelVersion>4.0.0</modelVersion> <groupId>sample-hello-microservice-springboot</groupId> <artifactId>sample-hello-microservice-springboot</artifactId> <version>0.0.1-SNAPSHOT</version> <description>Sample Hello microservice with Spring Boot.</description> <parent> <groupId>org.springframework.boot</groupId> <artifactId>spring-boot-starter-parent</artifactId> <version>2.0.1.RELEASE</version> </parent> <dependencies> <!-- Setup Spring Boot --> <dependency> <groupId>org.springframework.boot</groupId> <artifactId>spring-boot-starter</artifactId> </dependency> <!-- Setup Spring MVC & REST with Embedded Tomcat --> <dependency> <groupId>org.springframework.boot</groupId> <artifactId>spring-boot-starter-web</artifactId> </dependency> </dependencies> <build> <sourceDirectory>src</sourceDirectory> <plugins> <plugin> <artifactId>maven-compiler-plugin</artifactId> <version>3.5.1</version> <configuration> <source>1.8</source> <target>1.8</target> </configuration> </plugin> <plugin> <groupId>org.springframework.boot</groupId> <artifactId>spring-boot-maven-plugin</artifactId> <configuration> <archive> <manifest> <mainClass> com.techbyteslearn.lab.springboot.application.HelloApplication </mainClass> </manifest> </archive> </configuration> </plugin> </plugins> </build> </project>

Solution:

I added the Spring Boot Maven plugin and configured the main class in the pom.xml file.

After making this change, the JAR was created with the required manifest information, and the application started working fine when the JAR was executed.

You can see the screenshot below to see the result.


Checking on browser.


Hope this will help you. 

Thursday, June 13, 2019

AWS Lambda AccessDeniedException While Calling getIntents

I am getting the below issue (AccessDeniedException ) while calling getIntents in lambda function with NodeJs. Below screenshot shows my lambda function call.


AccessDeniedException Logs 


2019-06-13T05:11:41.415Z 2b50a8fb-81bc-4f35-b024-d8c4a7864c74 INFO { AccessDeniedException: User: arn:aws:sts::156576774796:assumed-role/fulfilClaimProcessRole/fulfilClaimProcess is not authorized to perform: lex:GetIntents on resource: arn:aws:lex:us-east-1:156576774796:intent:*at Object.extractError (/var/runtime/node_modules/aws-sdk/lib/protocol/json.js:51:27)at Request.extractError (/var/runtime/node_modules/aws-sdk/lib/protocol/rest_json.js:55:8)at Request.callListeners (/var/runtime/node_modules/aws-sdk/lib/sequential_executor.js:106:20)at Request.emit (/var/runtime/node_modules/aws-sdk/lib/sequential_executor.js:78:10)at Request.emit (/var/runtime/node_modules/aws-sdk/lib/request.js:683:14)at Request.transition (/var/runtime/node_modules/aws-sdk/lib/request.js:22:10)at AcceptorStateMachine.runTo (/var/runtime/node_modules/aws-sdk/lib/state_machine.js:14:12)at /var/runtime/node_modules/aws-sdk/lib/state_machine.js:26:10at Request.<anonymous> (/var/runtime/node_modules/aws-sdk/lib/request.js:38:9)at Request.<anonymous> (/var/runtime/node_modules/aws-sdk/lib/request.js:685:12)message:'User: arn:aws:sts::156576774796:assumed-role/fulfilClaimProcessRole/fulfilClaimProcess is not authorized to perform: lex:GetIntents on resource: arn:aws:lex:us-east-1:156576774796:intent:*',code: 'AccessDeniedException',time: 2019-06-13T05:11:41.355Z,requestId: 'baaca585-8d99-11e9-a134-070d28c2c0ab',statusCode: 403,retryable: false,retryDelay: 64.04832064780818 } 'AccessDeniedException: User: arn:aws:sts::156576774796:assumed-role/fulfilClaimProcessRole/fulfilClaimProcess is not authorized to perform: lex:GetIntents on resource: arn:aws:lex:us-east-1:156576774796:intent:*\n at Object.extractError (/var/runtime/node_modules/aws-sdk/lib/protocol/json.js:51:27)\n at Request.extractError (/var/runtime/node_modules/aws-sdk/lib/protocol/rest_json.js:55:8)\n at Request.callListeners (/var/runtime/node_modules/aws-sdk/lib/sequential_executor.js:106:20)\n at Request.emit (/var/runtime/node_modules/aws-sdk/lib/sequential_executor.js:78:10)\n at Request.emit (/var/runtime/node_modules/aws-sdk/lib/request.js:683:14)\n at Request.transition (/var/runtime/node_modules/aws-sdk/lib/request.js:22:10)\n at AcceptorStateMachine.runTo (/var/runtime/node_modules/aws-sdk/lib/state_machine.js:14:12)\n at /var/runtime/node_modules/aws-sdk/lib/state_machine.js:26:10\n at Request.<anonymous> (/var/runtime/node_modules/aws-sdk/lib/request.js:38:9)\n at Request.<anonymous> (/var/runtime/node_modules/aws-sdk/lib/request.js:685:12)'

Solutions :- It seems there is no access/privileges to access that resource. Now , I am going to give "AmazonLexFullAccess" to my lambda function. You need to attach the policy to your lambda function. Follow the below steps to attach the new permission.

  • Goto ->  Security, Identity, & Compliance => IAM (Identity and Access Management) 
  • Select Roles => Select your Lambda function role(Which is you would have created during function creation?) 
  • Now click on Attach policy 
  • Find AmazonLexFullAccess and click on attach.

Once you provide the AmazonLexFullAccess to your lambda function role , you will be able to call your lex:intents call. Its working for me. See the below response I got from the lex:intents call. I got my all intents I have created.


{
    "intents": [
        {
            "name": "AutoLoanDepartment",
            "description": null,
            "lastUpdatedDate": "2019-06-04T10:03:16.995Z",
            "createdDate": "2019-06-04T05:16:50.430Z",
            "version": "$LATEST"
        },
        {
            "name": "BookCar",
            "description": "Intent to book a car on StayBooker",
            "lastUpdatedDate": "2019-06-04T03:23:05.817Z",
            "createdDate": "2019-06-04T03:19:44.041Z",
            "version": "$LATEST"
        },
        {
            "name": "BookHotel",
            "description": "Intent to book a hotel on StayBooker",
            "lastUpdatedDate": "2019-06-04T03:19:43.241Z",
            "createdDate": "2019-06-04T03:19:43.241Z",
            "version": "$LATEST"
        },
        {
            "name": "ClaimDepartment",
            "description": null,
            "lastUpdatedDate": "2019-06-05T10:19:51.705Z",
            "createdDate": "2019-06-05T10:19:51.705Z",
            "version": "$LATEST"
        },
        {
            "name": "ClaimProcess",
            "description": null,
            "lastUpdatedDate": "2019-06-13T04:43:06.699Z",
            "createdDate": "2019-06-06T03:35:33.460Z",
            "version": "$LATEST"
        },
        {
            "name": "GreetingMSG",
            "description": null,
            "lastUpdatedDate": "2019-06-11T08:02:33.055Z",
            "createdDate": "2019-06-06T03:35:06.013Z",
            "version": "$LATEST"
        },
        {
            "name": "LoanDepartment",
            "description": null,
            "lastUpdatedDate": "2019-06-04T05:14:16.304Z",
            "createdDate": "2019-06-04T03:36:52.751Z",
            "version": "$LATEST"
        },
        {
            "name": "PersonalLoanDept",
            "description": null,
            "lastUpdatedDate": "2019-06-04T03:32:46.542Z",
            "createdDate": "2019-06-04T03:32:46.542Z",
            "version": "$LATEST"
        },
        {
            "name": "PolicyProcess",
            "description": null,
            "lastUpdatedDate": "2019-06-06T06:01:46.064Z",
            "createdDate": "2019-06-06T06:01:46.064Z",
            "version": "$LATEST"
        },
        {
            "name": "RenewPolicy",
            "description": null,
            "lastUpdatedDate": "2019-06-07T07:05:13.123Z",
            "createdDate": "2019-06-06T10:29:21.371Z",
            "version": "$LATEST"
        }
    ],
    "nextToken": null
}


Hope this will help you. 

AWS Lex: Version Mismatch Issue and Simple Fix

This is very common problem with Lex when you are working with a version which is not matching with the published one. I have fixed this with a simple refresh the page. Either, you can reload your bot again. I will keep posting more on AWS Lex, lambda, cognito, ec2,etc in my upcoming posts, so stay tune here  :)

Saturday, October 27, 2018

Filter Strings Using Stream API in Java


In this article we will learn how to use Java 8 Stream Filter with Example,  I have used String list to filter the names. Stream, A sequence of elements supporting sequential and parallel aggregate operations. Below example will show you how to filter the list with predicate.

StringFilterUsingStream.java

package com.techbyteslearn.tutorial;

import java.util.ArrayList;
import java.util.List;
import java.util.stream.Collectors;

public class StringFilterUsingStream {

    public static void main(String[] str) {

        List<String> nameList = new ArrayList<String>();

        nameList.add("Roshna");
        nameList.add("Amit Kumar");
        nameList.add("Manoj");
        nameList.add("Neha");
        nameList.add("Rina");
        nameList.add("Ashna");
        nameList.add("Peter");
        nameList.add("Deb Kumar");

        System.out.println("All Names ::");
        nameList.stream().forEach(name -> System.out.println(name));

        // Filter all names ending with "Kumar"
        List<String> filteredList = nameList.stream()
                .filter(name -> name.endsWith("Kumar"))
                .collect(Collectors.toList());

        System.out.println("\nFiltered Names ::");
        filteredList.stream().forEach(name -> System.out.println(name));
    }
}

Output:

All Names :: Roshna Amit Kumar Manoj Neha Rina Ashna Peter Deb Kumar Filtered Names :: Amit Kumar Deb Kumar

I changed the comment from “ends with” to “ending with” and formatted the stream expression for readability. The program logic remains the same.


Hope this will help you. Happy Learning.


Sunday, April 22, 2018

Check NullPointerException in JDK 8 – Use Optional


How to handle NullPointerException or null check in JDK8 ? Checking null in JDK8 using Optional<T>.

NullPointerException is most common exception which each developer need to handle. Its very common while you are playing around many object. Before JDK 8 , it was a tedious task and lots of boilerplate code you need to write to handle this NullPointerException. But, after JDK 8 it Make your code more readable and protect it against null pointer exceptions. This API will help to write cleaner and more readable code , with intelligence to handle null check internally.

Below Example has few demonstration , how to use the Optional<T> api to avoid NullPointerException. You can handle Null check for your object.


Employee.java


package com.techbyteslearn.tutorial.jdk8;

public class Employee {
private String empName;
private int age;
private Address empAddress;
public String getEmpName() {
return empName;
}
public void setEmpName(String empName) {
this.empName = empName;
}
public int getAge() {
return age;
}
public void setAge(int age) {
this.age = age;
}
public Address getEmpAddress() {
return empAddress;
}
public void setEmpAddress(Address empAddress) {
this.empAddress = empAddress;
}
}

Address.java
package com.techbyteslearn.tutorial.jdk8;
public class Address {
private String homeUnitNo;
private String streetNo;
private String city;
public String getHomeUnitNo() {
return homeUnitNo;
}
public void setHomeUnitNo(String homeUnitNo) {
this.homeUnitNo = homeUnitNo;
}
public String getStreetNo() {
return streetNo;
}
public void setStreetNo(String streetNo) {
this.streetNo = streetNo;
}
public String getCity() {
return city;
}
public void setCity(String city) {
this.city = city;
}
}

NullPointerCheck.java

package com.techbyteslearn.tutorial.jdk8; import java.util.Optional; public class NullPointerCheck { public static void main(String[] args) { String empName = null; /** * Before JDK 8, this will print "Print null". */ if (null != empName) { System.out.println("Print not null"); } else { System.out.println("Print null"); } /** * Before JDK 8, this throws NullPointerException. */ try { if (empName.equals("SomeThing")) { System.out.println("Print SomeThing"); } } catch (Exception e) { e.printStackTrace(); } /** * JDK 8 provides an easy and clean API, i.e. Optional<T>, * for handling this type of scenario. */ Optional<String> optionalString = Optional.ofNullable(empName); if (optionalString.isPresent()) { System.out.println("Employee Name ::" + empName); } /** * How to work with your own objects. */ Employee employee = new Employee(); employee.setEmpName("Peter"); Optional<Employee> optionalEmployee = Optional.ofNullable(employee); if (optionalEmployee.map(Employee::getEmpAddress).isPresent()) { System.out.println(employee.getEmpName() + "- Address is registered"); } else { System.out.println(employee.getEmpName() + "- Address is null"); } Employee employee1 = new Employee(); employee1.setEmpName("Mark Garret"); Address address = new Address(); address.setCity("Sydney"); employee1.setEmpAddress(address); Optional<Employee> optionalEmployeeWithAddress = Optional.ofNullable(employee1); if (optionalEmployeeWithAddress.map(Employee::getEmpAddress).isPresent()) { System.out.println( employee1.getEmpName() + "- Address is " + address.getCity()); } else { System.out.println(employee1.getEmpName() + "- Address is null"); } /** * Use Optional.empty() to represent an empty value. */ Employee empObject = new Employee(); System.out.println( "Returns Optional empty Value ::" + Optional.empty()); /* * Optional.of() does not handle null values. Be careful when using * this method. Use ofNullable() when the value may be null. */ System.out.println( "Returns Optional empty Value ::" + Optional.of(empObject) .map(Employee::getEmpAddress) .isPresent()); } }

Output:

Print null java.lang.NullPointerException at com.javadevelopersguide.tutorial.jdk8.NullPointerCheck.main(NullPointerCheck.java:48) Peter- Address is null Mark Garret- Address is Sydney Returns Optional empty Value ::Optional.empty Returns Optional empty Value ::false


Small technical note: Optional.of(empObject) itself is safe here because empObject is not null. The map() operation then produces Optional.empty() because getEmpAddress() returns null.

I have used below methods from Optional<T> :-

empty() - Returns an empty Optional instance


of() - Returns an Optional with the specified present non-null value.


isPresent() - If a value is present, invoke the specified consumer with the value, otherwise do nothing.


map() - If a value is present, apply the provided mapping function to it, and if the result is non-null, return an Optional describing the result.


ofNullable() - Returns an Optional describing the specified value, if non-null, otherwise returns an empty Optional.


There are few more methods are there, you can give a try. Below link will give you a complete information. Read more about the Optional<T> by JDK 8.


Hope it will help you.

Thursday, March 15, 2018

How to Create Your First Spring Boot Application

Developing your first Spring Boot application is quite easy. As we know Spring Boot makes it easy to create stand-alone, production-grade Spring based Applications that you can "just run". Its basically to minimize the configuration. 

In this example I have used below frameworks and tools for this example.

1. Maven 3.3.9 
2. JDK 1.8
3. Eclipse IDE
4. spring-boot dependency 


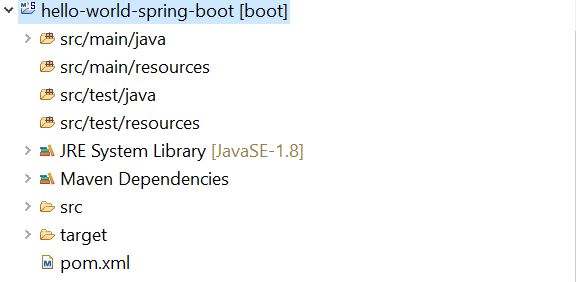
First step - In eclipse create a maven project  "hello-world-spring-boot" as below .


Then add the dependency for spring-boot and plug-in in the pom.xml file.


Pom.xml

<project xmlns="http://maven.apache.org/POM/4.0.0" xmlns:xsi="http://www.w3.org/2001/XMLSchema-instance"
xsi:schemaLocation="http://maven.apache.org/POM/4.0.0 http://maven.apache.org/xsd/maven-4.0.0.xsd">
<modelVersion>4.0.0</modelVersion>
<groupId>com.javadevelopersguide.www</groupId>
<artifactId>hello-world-spring-boot</artifactId>
<version>0.0.1-SNAPSHOT</version>
<description>This is a hello world example with Spring Boot.</description>
<parent>
<groupId>org.springframework.boot</groupId>
<artifactId>spring-boot-starter-parent</artifactId>
<version>1.5.10.RELEASE</version>
</parent>
<dependencies>
<dependency> <groupId>org.springframework.boot</groupId> <artifactId>spring-boot-starter-web</artifactId> </dependency> </dependencies>
<properties>
<java.version>1.8</java.version>
</properties>
<build>
<plugins>
<plugin>
<groupId>org.springframework.boot</groupId>
<artifactId>spring-boot-maven-plugin</artifactId>
</plugin>

</plugins>
</build>
</project>
Then create a controller class "HelloWorldController" with a rest api method sayHello()

HelloWorldController.java
package com.techbyteslearn.springboot.example;
import org.springframework.boot.autoconfigure.EnableAutoConfiguration;
import org.springframework.stereotype.Controller;
import org.springframework.web.bind.annotation.RequestMapping;
import org.springframework.web.bind.annotation.ResponseBody;

@Controller
@EnableAutoConfiguration
public class HelloWorldController {
@RequestMapping("/hello")
@ResponseBody
public String sayHello() {
return "Hello World Developer!!!";
}
}
I have use below annotations in my controller. Here in this example the uri path is /hello

@Controller - This is used to specify the controller , as its spring framework basic.
@EnableAutoConfiguration - This enable auto configuration for Application Context. 
@RequestMapping - This is used to map to spring mvc controller method.
@ResponseBody - Used to bind http response body with a domain object in return type.Its behind the scenes. 

Now , my controller is ready.Just I need a luncher , who can lunch my spring boot application. I have created a "SpringBootApplicationLuncher".

SpringBootApplicationLuncher.java


package com.techbyteslearn.springboot.example;
import org.springframework.boot.SpringApplication;

public class SpringBootApplicationLuncher {
public static void main(String[] args) {
SpringApplication.run(HelloWorldController.class, args);
}
}

Now you can run this launcher to start the spring boot application.Then, you can see the below screenshot showing the tomcat is started. As you know spring-boot is embedded with tomcat feature.


Now , your application is up and running . I have highlighted above that the tomcat is started on default port 8080

Try this tomcat URL, which is running now :- http://localhost:8080/hello


Alternatively , Also you can also start your spring-boot application on command line (Terminal). I have used windows OS.

You can use the below Maven Command  to build and run this spring-boot application :- 


1. Build the application :- mvn clean install


2. Run the application :- mvn spring-boot:run


 Now the service is running on tomcat port 8080 .Use the below URL to access the sayHello() api.

http://localhost:8080/hello

Sunday, March 11, 2018

How to Edit or Fix the Last Git Commit Message

How can I edit / fix the last git commits message?

Amending any message to your git or bit-bucket is quite easy. Normally sometime, a developer need to modify the last committed message in git/bit-bucket. Git command is providing easy commands to achieve this. Follow the below steps with attached screen shot and you can do this.

Just pull your working branch , where  you want to modify the last commit. But, make sure you want to modify your last commit for the working branch.I have bit-bucket in this example post.

Command Syntax:-


git commit --amend -m "Your Amend Message"
Then use the below command to push your changes.
git push -f  origin master

Example , as per the attached screenshot. I have used the command prompt for this example. In the below example , I have updated the new message "Amending new message". Then, push  (used -means --force) the message to git/bit-bucket. Use the below screenshot as reference. 


bit-bucket command - Java Developers Guide
Bit-Bucket amend


Now, you can see in bit-bucket the last committed message. The last message I have modified , its reflecting.


bit bucket amend
Bit-Bucket web view


Hope it will help you.