Monday, July 1, 2019

Producer Consumer Example Using BlockingQueue in Java

Threading is a very tricky and interesting concept in java programming language. There are many problems we face in technology out of which producer-consumer is one. Today we will write a java program for showing producer consumer problem and its solution by using BlockingQueue implementation. 

In this program we will use ArrayBlockingQueue

FoodProducer.java

package com.techbyteslearn.lab.concurrent; import java.util.concurrent.BlockingQueue; public class FoodProducer implements Runnable { private BlockingQueue<String> producerQueue = null; public FoodProducer(BlockingQueue<String> queue) { producerQueue = queue; } @Override public void run() { try { producerQueue.put("Drinks"); Thread.sleep(2000); producerQueue.put("Chocolates"); Thread.sleep(2000); producerQueue.put("Fruits"); Thread.sleep(2000); } catch (InterruptedException e) { Thread.currentThread().interrupt(); e.printStackTrace(); } } }


FoodConsumer.java


package com.techbyteslearn.lab.concurrent;

import java.util.concurrent.BlockingQueue;

public class FoodConsumer implements Runnable {

    private BlockingQueue<String> consumerQueue = null;

    public FoodConsumer(BlockingQueue<String> consumerQueue) {
        this.consumerQueue = consumerQueue;
    }

    @Override
    public void run() {
        try {
            System.out.println(consumerQueue.take());
            System.out.println(consumerQueue.take());
            System.out.println(consumerQueue.take());

            Thread.sleep(2000);

        } catch (InterruptedException e) {
            Thread.currentThread().interrupt();
            e.printStackTrace();
        }
    }
}


MainFoodProcess.java


package com.techbyteslearn.lab.concurrent; import java.util.concurrent.ArrayBlockingQueue; import java.util.concurrent.BlockingQueue; public class MainFoodProcess { public static void main(String[] args) throws InterruptedException { final BlockingQueue<String> queue = new ArrayBlockingQueue<>(2); FoodProducer producer = new FoodProducer(queue); FoodConsumer consumer = new FoodConsumer(queue); new Thread(producer).start(); new Thread(consumer).start(); Thread.sleep(3000); } }

Output:

Drinks 
Chocolates 
Fruits
The important point in this example is that the ArrayBlockingQueue has a capacity of 2, while the producer adds three items. The put() method blocks when the queue is full until the consumer takes an item from the queue.

The output here is that, every time the producer insert element into the Queue the consumer will take that element out of the queue. 

Here we have used the below 2 important methods take() and put(). There are few many method provided by the BlockingQueue implementation. Find more methods on BlockingQueue.

take() - Retrieves and removes the head of this queue, waiting if necessary until an element becomes available.
put() - Inserts the specified element into this queue, waiting if necessary for space to become available.


Happy Learning.

How to Get Latitude and Longitude Using JavaScript

In this article we will see how to get the latitude and longitude. As we know java script is a high-level programming language,  it gives many libraries to implement in our program to achieve real time necessities.  Here we have used Navigator and Geolocation in our program.

We have used the Navigator.geolocation , its a read-only property returns a Geolocation object that gives Web content access to the location of the device.

sample-geolocation.html

<!DOCTYPE html>
<html>
<body>
<title>Get Current Location Sample</title>
<h4>Click the below button to get your current location coordinates.</h4>
<button onclick="getLocation()">Get My Current Location</button>
<div id="displayId"></div>
<script>
var display = document.getElementById("displayId");
function getLocation() {
  if (navigator.geolocation) {
    navigator.geolocation.getCurrentPosition(displayPosition);
  } else {
    display.innerHTML = "Geolocation is not supported by this browser.";
  }
}
function displayPosition(position) {
  display.innerHTML = "<br>Latitude: " + position.coords.latitude +
  "<br>Longitude: " + position.coords.longitude;
}
</script>
</body>
</html>

Now, we can see the output on the browser as below.


Tuesday, June 25, 2019

Deploying Spring Boot Microservice to Docker - A Quick Guide

In this article we will deploy our spring boot micro service into docker. In our previous article we had created a simple "Hello World" spring boot micro service. Now, we will deploy that application into Docker. Check how to create a spring boot micro service

Docker with spring boot is the current popular technology stack which enables organization to seamlessly develop and make production ready artifacts. If you want to learn more about docker, read more here. 


Before deploying the application into docker,  make sure you have installed the docker. In this example we have used Docker Community Edition ( Docker CE) on windows OS. How to install docker on Windows/MacOS/Linux. We can also use Alpine Linux image , it provide minimal Linux environment to deploy & run the application.There are few docker commands to manage your application. Below sample command and screen shot shows to check the version of your installed docker engine. 

Command - 
     docker --version


What we need to deploy a spring boot application in Docker? 
  • First, we need to create an Image file for our application. Docker image is a most important component for docker engine. Docker provides a docker hub, its an library and community for container images. We can use docker hub to get the most common images .  In the below project structure , we have created a "Dockerfile.txt". If you put this docker file into the class path, then docker engine will automatically identify and load this file. This docker file name is very sensitive, so you must follow the naming convention as mentioned in the below screen shot. Docker reads commands/instructions from "Dockerfile.txt" and build the image. 

The below docker file contains the commands to create the image. Actually there are many commands used for different purpose. Here we have used few commands as per our needs.


    • FROM  - Must be the first non-comment instruction in the Dockerfile. This command creates layer from the docker image. In our case we have used java:8, It means this application will run on java 8.
    • EXPOSE - Exposing port for the endpoint. In this example we have configure 8080.
    • ADD - This command helps to takes a source and destination. Normally source is your local copy. COPY command also does same thing , but there is small difference between COPY & ADD command.
    • ENTRYPOINT - Its similar to CMD, where our command/jar file will be executed.
    • There are many other commands for creating docker image. Read more about docker command.


  • Now , run the command to build the image and deploy into docker. Before running the docker command we need to create the .jar file. Because, we are creating a jar file and then creating the jar file as docker image. So, here we have used mvn clean install command to create the jar file.

Creating a jar file. Below maven command is used to create the jar file.
     clean install 


Now , we can see below the .jar file has been created.


Create a docker image file. Below command is used to create the image file.

Syntax - docker build -t <image file name> <destination directory>

docker build -t sample-hello-microservice-springboot .


As per the above screenshot, it seems we have created the docker image successfully. You can check the created image by using command "docker images".

docker images


Now, our image file is ready. We can push this image to docker container using below command .

Syntax - docker run -p <exposed port> -t <image file name>

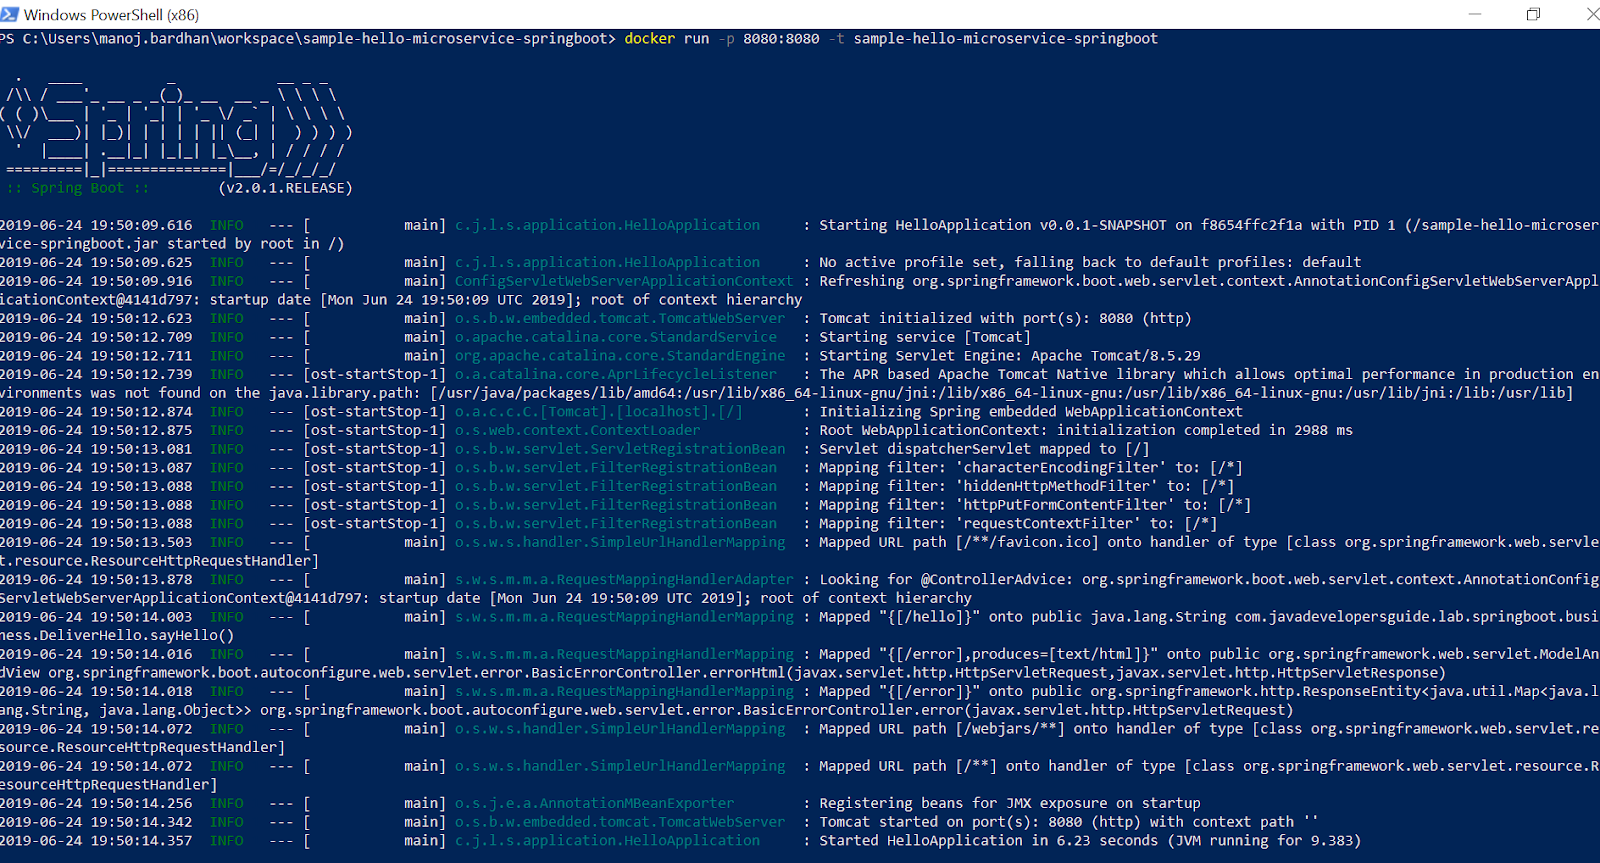
docker run -p 8080:8080 -t sample-hello-microservice-springboot


Now our micro service has been deployed to docker and its exposed on port 8080 as per our configuration in the docker file. We can check the running container and its status.


Now we can also accessed from browser as below.

There are few useful docker command as below .

docker system prune 

This will remove:                                                                                                                               - all stopped containers
       - all networks not used by at least one container
       - all dangling images     
       - all dangling build cache 

docker ps -a 

This will show all process in docker engine.

docker images

This will show all the images you created.

docker stop <container id>

This will stop the container.

If required , there are help options to get the help about each command. Read more.
docker ps --help
docker run --help


Hope it will help you.


Monday, June 17, 2019

Spring Boot JAR Error: No Main Manifest Attribute

The error "no main manifest attribute, in sample-hello-microservice-springboot.jar" occurred while trying to execute the JAR file.

This was an unusual issue with JAR file execution. In this case, I was trying to run the Docker image. The reason for this issue was that, during JAR execution, it was not able to locate the main class.

Below is the main class, HelloApplication, and the pom.xml file. It seems that the Spring Boot Maven plugin was missing, along with the configuration for the manifest (mainClass).

HelloApplication.java

package com.techbyteslearn.lab.springboot.application;

import org.springframework.boot.SpringApplication;
import org.springframework.boot.autoconfigure.SpringBootApplication;

@SpringBootApplication
public class HelloApplication {

    public static void main(String[] args) {
        SpringApplication.run(HelloApplication.class, args);
    }
}

pom.xml

<project xmlns="http://maven.apache.org/POM/4.0.0" xmlns:xsi="http://www.w3.org/2001/XMLSchema-instance" xsi:schemaLocation="http://maven.apache.org/POM/4.0.0 http://maven.apache.org/xsd/maven-4.0.0.xsd"> <modelVersion>4.0.0</modelVersion> <groupId>sample-hello-microservice-springboot</groupId> <artifactId>sample-hello-microservice-springboot</artifactId> <version>0.0.1-SNAPSHOT</version> <description>Sample Hello microservice with Spring Boot.</description> <parent> <groupId>org.springframework.boot</groupId> <artifactId>spring-boot-starter-parent</artifactId> <version>2.0.1.RELEASE</version> </parent> <dependencies> <!-- Setup Spring Boot --> <dependency> <groupId>org.springframework.boot</groupId> <artifactId>spring-boot-starter</artifactId> </dependency> <!-- Setup Spring MVC & REST with Embedded Tomcat --> <dependency> <groupId>org.springframework.boot</groupId> <artifactId>spring-boot-starter-web</artifactId> </dependency> </dependencies> <build> <sourceDirectory>src</sourceDirectory> <plugins> <plugin> <artifactId>maven-compiler-plugin</artifactId> <version>3.5.1</version> <configuration> <source>1.8</source> <target>1.8</target> </configuration> </plugin> <plugin> <groupId>org.springframework.boot</groupId> <artifactId>spring-boot-maven-plugin</artifactId> <configuration> <archive> <manifest> <mainClass> com.techbyteslearn.lab.springboot.application.HelloApplication </mainClass> </manifest> </archive> </configuration> </plugin> </plugins> </build> </project>

Solution:

I added the Spring Boot Maven plugin and configured the main class in the pom.xml file.

After making this change, the JAR was created with the required manifest information, and the application started working fine when the JAR was executed.

You can see the screenshot below to see the result.


Checking on browser.


Hope this will help you. 

Thursday, June 13, 2019

AWS Lambda AccessDeniedException While Calling getIntents

I am getting the below issue (AccessDeniedException ) while calling getIntents in lambda function with NodeJs. Below screenshot shows my lambda function call.


AccessDeniedException Logs 


2019-06-13T05:11:41.415Z 2b50a8fb-81bc-4f35-b024-d8c4a7864c74 INFO { AccessDeniedException: User: arn:aws:sts::156576774796:assumed-role/fulfilClaimProcessRole/fulfilClaimProcess is not authorized to perform: lex:GetIntents on resource: arn:aws:lex:us-east-1:156576774796:intent:*at Object.extractError (/var/runtime/node_modules/aws-sdk/lib/protocol/json.js:51:27)at Request.extractError (/var/runtime/node_modules/aws-sdk/lib/protocol/rest_json.js:55:8)at Request.callListeners (/var/runtime/node_modules/aws-sdk/lib/sequential_executor.js:106:20)at Request.emit (/var/runtime/node_modules/aws-sdk/lib/sequential_executor.js:78:10)at Request.emit (/var/runtime/node_modules/aws-sdk/lib/request.js:683:14)at Request.transition (/var/runtime/node_modules/aws-sdk/lib/request.js:22:10)at AcceptorStateMachine.runTo (/var/runtime/node_modules/aws-sdk/lib/state_machine.js:14:12)at /var/runtime/node_modules/aws-sdk/lib/state_machine.js:26:10at Request.<anonymous> (/var/runtime/node_modules/aws-sdk/lib/request.js:38:9)at Request.<anonymous> (/var/runtime/node_modules/aws-sdk/lib/request.js:685:12)message:'User: arn:aws:sts::156576774796:assumed-role/fulfilClaimProcessRole/fulfilClaimProcess is not authorized to perform: lex:GetIntents on resource: arn:aws:lex:us-east-1:156576774796:intent:*',code: 'AccessDeniedException',time: 2019-06-13T05:11:41.355Z,requestId: 'baaca585-8d99-11e9-a134-070d28c2c0ab',statusCode: 403,retryable: false,retryDelay: 64.04832064780818 } 'AccessDeniedException: User: arn:aws:sts::156576774796:assumed-role/fulfilClaimProcessRole/fulfilClaimProcess is not authorized to perform: lex:GetIntents on resource: arn:aws:lex:us-east-1:156576774796:intent:*\n at Object.extractError (/var/runtime/node_modules/aws-sdk/lib/protocol/json.js:51:27)\n at Request.extractError (/var/runtime/node_modules/aws-sdk/lib/protocol/rest_json.js:55:8)\n at Request.callListeners (/var/runtime/node_modules/aws-sdk/lib/sequential_executor.js:106:20)\n at Request.emit (/var/runtime/node_modules/aws-sdk/lib/sequential_executor.js:78:10)\n at Request.emit (/var/runtime/node_modules/aws-sdk/lib/request.js:683:14)\n at Request.transition (/var/runtime/node_modules/aws-sdk/lib/request.js:22:10)\n at AcceptorStateMachine.runTo (/var/runtime/node_modules/aws-sdk/lib/state_machine.js:14:12)\n at /var/runtime/node_modules/aws-sdk/lib/state_machine.js:26:10\n at Request.<anonymous> (/var/runtime/node_modules/aws-sdk/lib/request.js:38:9)\n at Request.<anonymous> (/var/runtime/node_modules/aws-sdk/lib/request.js:685:12)'

Solutions :- It seems there is no access/privileges to access that resource. Now , I am going to give "AmazonLexFullAccess" to my lambda function. You need to attach the policy to your lambda function. Follow the below steps to attach the new permission.

  • Goto ->  Security, Identity, & Compliance => IAM (Identity and Access Management) 
  • Select Roles => Select your Lambda function role(Which is you would have created during function creation?) 
  • Now click on Attach policy 
  • Find AmazonLexFullAccess and click on attach.

Once you provide the AmazonLexFullAccess to your lambda function role , you will be able to call your lex:intents call. Its working for me. See the below response I got from the lex:intents call. I got my all intents I have created.


{
    "intents": [
        {
            "name": "AutoLoanDepartment",
            "description": null,
            "lastUpdatedDate": "2019-06-04T10:03:16.995Z",
            "createdDate": "2019-06-04T05:16:50.430Z",
            "version": "$LATEST"
        },
        {
            "name": "BookCar",
            "description": "Intent to book a car on StayBooker",
            "lastUpdatedDate": "2019-06-04T03:23:05.817Z",
            "createdDate": "2019-06-04T03:19:44.041Z",
            "version": "$LATEST"
        },
        {
            "name": "BookHotel",
            "description": "Intent to book a hotel on StayBooker",
            "lastUpdatedDate": "2019-06-04T03:19:43.241Z",
            "createdDate": "2019-06-04T03:19:43.241Z",
            "version": "$LATEST"
        },
        {
            "name": "ClaimDepartment",
            "description": null,
            "lastUpdatedDate": "2019-06-05T10:19:51.705Z",
            "createdDate": "2019-06-05T10:19:51.705Z",
            "version": "$LATEST"
        },
        {
            "name": "ClaimProcess",
            "description": null,
            "lastUpdatedDate": "2019-06-13T04:43:06.699Z",
            "createdDate": "2019-06-06T03:35:33.460Z",
            "version": "$LATEST"
        },
        {
            "name": "GreetingMSG",
            "description": null,
            "lastUpdatedDate": "2019-06-11T08:02:33.055Z",
            "createdDate": "2019-06-06T03:35:06.013Z",
            "version": "$LATEST"
        },
        {
            "name": "LoanDepartment",
            "description": null,
            "lastUpdatedDate": "2019-06-04T05:14:16.304Z",
            "createdDate": "2019-06-04T03:36:52.751Z",
            "version": "$LATEST"
        },
        {
            "name": "PersonalLoanDept",
            "description": null,
            "lastUpdatedDate": "2019-06-04T03:32:46.542Z",
            "createdDate": "2019-06-04T03:32:46.542Z",
            "version": "$LATEST"
        },
        {
            "name": "PolicyProcess",
            "description": null,
            "lastUpdatedDate": "2019-06-06T06:01:46.064Z",
            "createdDate": "2019-06-06T06:01:46.064Z",
            "version": "$LATEST"
        },
        {
            "name": "RenewPolicy",
            "description": null,
            "lastUpdatedDate": "2019-06-07T07:05:13.123Z",
            "createdDate": "2019-06-06T10:29:21.371Z",
            "version": "$LATEST"
        }
    ],
    "nextToken": null
}


Hope this will help you. 

AWS Lex: Version Mismatch Issue and Simple Fix

This is very common problem with Lex when you are working with a version which is not matching with the published one. I have fixed this with a simple refresh the page. Either, you can reload your bot again. I will keep posting more on AWS Lex, lambda, cognito, ec2,etc in my upcoming posts, so stay tune here  :)

Saturday, October 27, 2018

Filter Strings Using Stream API in Java


In this article we will learn how to use Java 8 Stream Filter with Example,  I have used String list to filter the names. Stream, A sequence of elements supporting sequential and parallel aggregate operations. Below example will show you how to filter the list with predicate.

StringFilterUsingStream.java

package com.techbyteslearn.tutorial;

import java.util.ArrayList;
import java.util.List;
import java.util.stream.Collectors;

public class StringFilterUsingStream {

    public static void main(String[] str) {

        List<String> nameList = new ArrayList<String>();

        nameList.add("Roshna");
        nameList.add("Amit Kumar");
        nameList.add("Manoj");
        nameList.add("Neha");
        nameList.add("Rina");
        nameList.add("Ashna");
        nameList.add("Peter");
        nameList.add("Deb Kumar");

        System.out.println("All Names ::");
        nameList.stream().forEach(name -> System.out.println(name));

        // Filter all names ending with "Kumar"
        List<String> filteredList = nameList.stream()
                .filter(name -> name.endsWith("Kumar"))
                .collect(Collectors.toList());

        System.out.println("\nFiltered Names ::");
        filteredList.stream().forEach(name -> System.out.println(name));
    }
}

Output:

All Names :: Roshna Amit Kumar Manoj Neha Rina Ashna Peter Deb Kumar Filtered Names :: Amit Kumar Deb Kumar

I changed the comment from “ends with” to “ending with” and formatted the stream expression for readability. The program logic remains the same.


Hope this will help you. Happy Learning.